Step 1: Deploy Keycloak with Docker and PostgreSQL
1.1 Set Up PostgreSQL
Create a PostgreSQL instance for Keycloak’s data persistence.
mkdir -p ~/keycloak/postgresCreate a docker-compose.yml file for Keycloak and PostgreSQL:
version: '3.8'
services:
  postgres:
    image: postgres:16
    environment:
      POSTGRES_DB: keycloak
      POSTGRES_USER: keycloak
      POSTGRES_PASSWORD: secure_password
    volumes:
      - ./postgres:/var/lib/postgresql/data
    restart: unless-stopped
  keycloak:
    image: quay.io/keycloak/keycloak:26.0
    command: start
    environment:
      KC_DB: postgres
      KC_DB_URL: jdbc:postgresql://postgres:5432/keycloak
      KC_DB_USERNAME: keycloak
      KC_DB_PASSWORD: secure_password
      KC_HOSTNAME: auth.example.com
      KC_PROXY: edge
      KEYCLOAK_ADMIN: admin
      KEYCLOAK_ADMIN_PASSWORD: admin_secure_password
    ports:
      - "8080:8080"
    depends_on:
      - postgres
    restart: unless-stopped
Save this as keycloak/docker-compose.yml. Replace secure_password and admin_secure_password with strong, unique values, and update auth.example.com to your Keycloak subdomain.
1.2 Configure Nginx for SSL
Set up Nginx as a reverse proxy to secure Keycloak with HTTPS.
Install Nginx:
sudo apt update
sudo apt install nginx
Create an Nginx configuration file:
sudo nano /etc/nginx/sites-available/keycloakAdd the following, replacing auth.example.com with your subdomain:
server {
    listen 80;
    server_name auth.example.com;
    return 301 https://$host$request_uri;
}

server {
    listen 443 ssl;
    server_name auth.example.com;

    ssl_certificate /etc/letsencrypt/live/auth.example.com/fullchain.pem;
    ssl_certificate_key /etc/letsencrypt/live/auth.example.com/privkey.pem;

    location / {
        proxy_pass http://localhost:8080;
        proxy_set_header Host $host;
        proxy_set_header X-Real-IP $remote_addr;
        proxy_set_header X-Forwarded-For $proxy_add_x_forwarded_for;
        proxy_set_header X-Forwarded-Proto $scheme;
    }
}
Enable the configuration:
sudo ln -s /etc/nginx/sites-available/keycloak /etc/nginx/sites-enabled/
sudo nginx -t
sudo systemctl reload nginx
Obtain an SSL certificate using Certbot:
sudo apt install certbot python3-certbot-nginx
sudo certbot --nginx -d auth.example.com
1.3 Start Keycloak
Launch the Keycloak stack:
cd ~/keycloak
docker-compose up -d
Access the Keycloak admin console at https://auth.example.com/admin, logging in with admin and admin_secure_password. Change the admin password immediately for security.
Step 2: Configure Keycloak as a SAML Identity Provider
Keycloak will act as the Identity Provider (IdP) for n8n. We’ll configure a SAML client, and set up mappers for user attributes.
Get required information from N8N

- Navigate to Settings -> SSO
- Save the Entity ID and Redirect URL
Create a SAML Client for n8n
- Navigate to Clients > Create Client.
- Set:
- Client Type: SAML
- Client ID: (n8n’s Entity ID from previous step, matching its base URL)
- Name: n8n (Your choice)
- Configure:
- Valid Redirect URIs: https://n8n.example.com/saml/acs (Redirect URI from previous step)
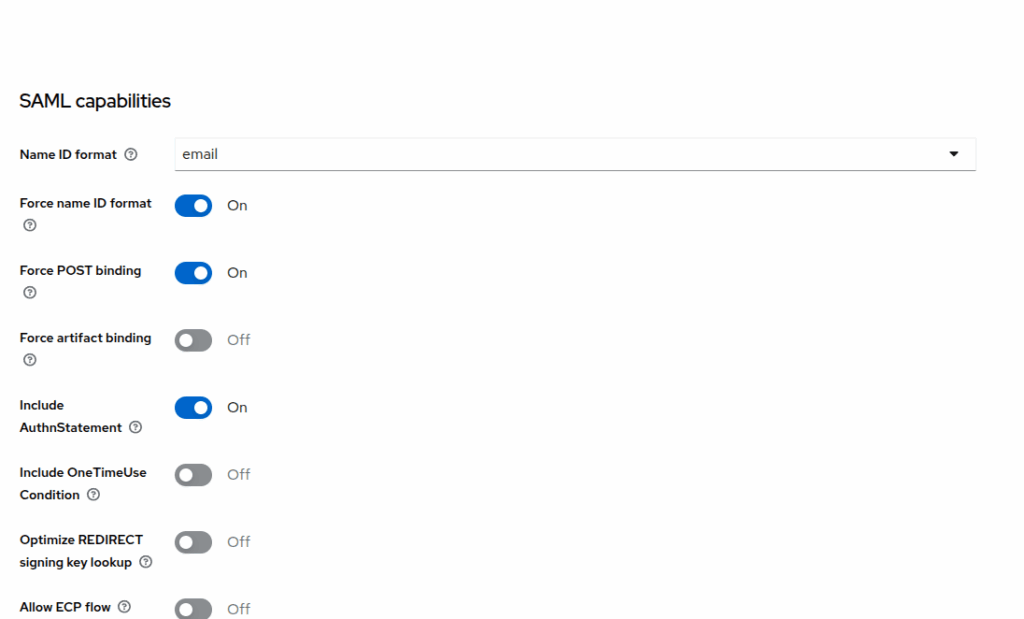
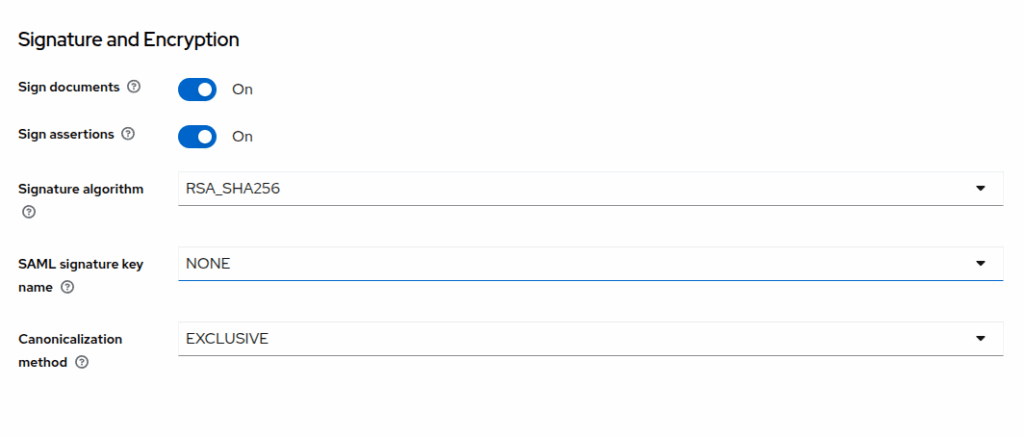
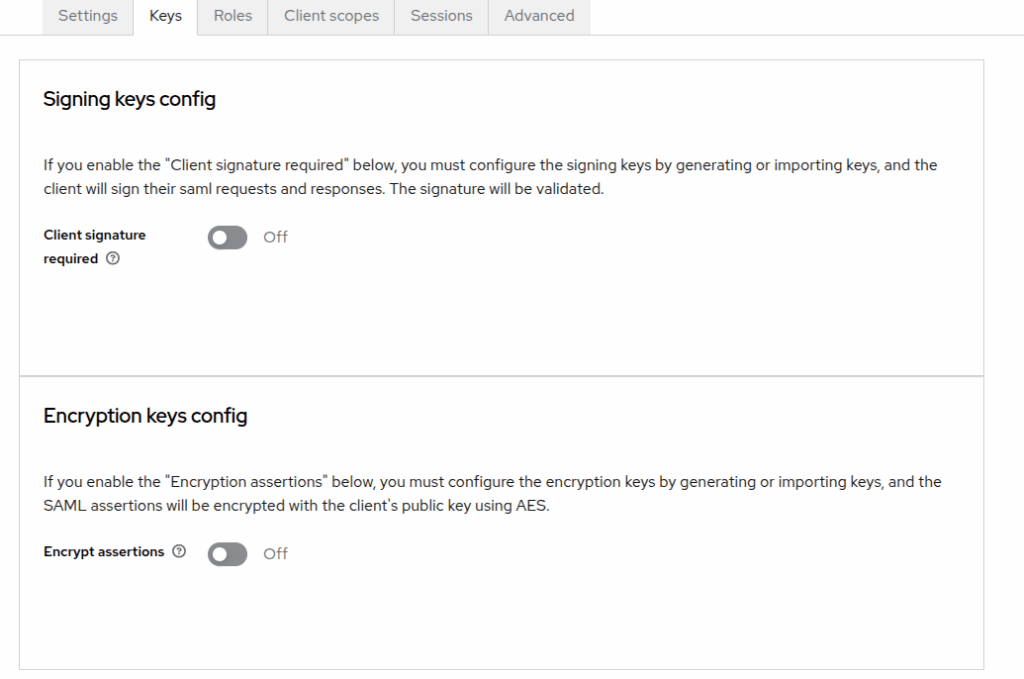
- Settings: (Image below)
- Name ID format: Email
- Force name ID format: ON
- Force POST binding: ON
- Include AuthnStatement: ON
- Sign Document: ON
- Sign Asseration: ON
- Client Signature Required: Off
- Save the client.
Configure Mappers
Mappers define how user attributes are sent to n8n.
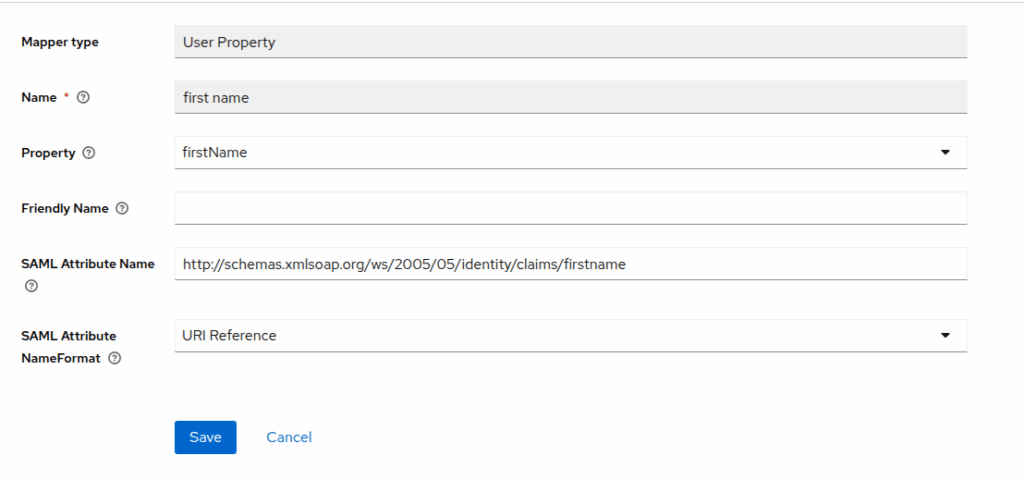
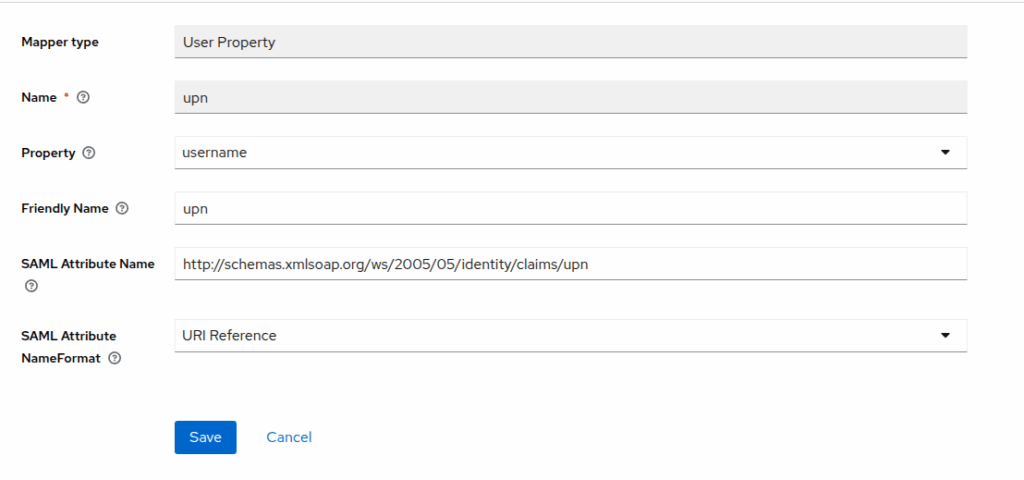
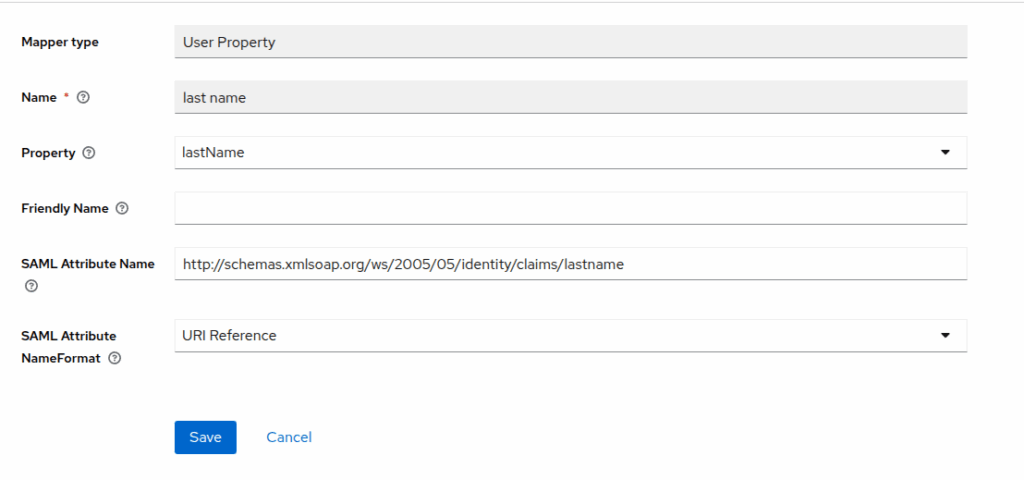
- In the n8n client, go to Clients Scope > (The entity id, ex: https://yourdomain.com/rest/sso/saml/metadata-dedicated)
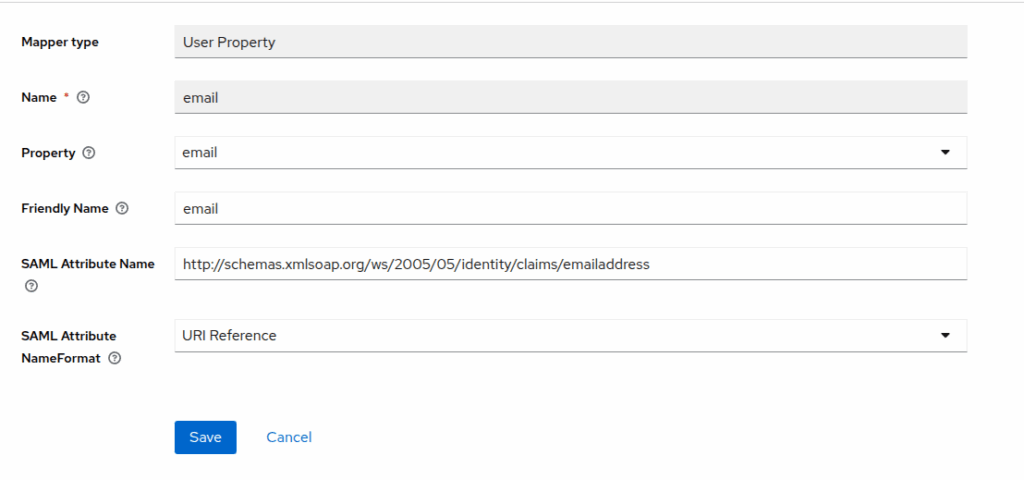
- Add mapper -> By configuration -> User property
2. Create the mapper like image, each one config look like this

Export SAML Metadata
- Go to Realm Settings > SAML 2.0 Identity Provider Metadata.
- Download the XML file or copy the metadata URL (e.g., https://auth.example.com/realms/n8n-realm/protocol/saml/descriptor).


Setup the N8N use SAML metadata

Edit metadata
Locate <md:IDPSSODescriptor WantAuthnRequestsSigned=”true” in the XML, and change true to false
Final gonna look like <md:IDPSSODescriptor WantAuthnRequestsSigned=”false”
Test Setting
- Open an incognito browser window and navigate to https://n8n.example.com.
- You should be redirected to Keycloak’s login page.
- Log in with a Keycloak user (create one in Users > Add User if needed, ensuring the email matches an n8n user).
- Upon successful authentication, you should be redirected to n8n’s dashboard.
![[SWE học A.I] Phần 8: Model Training & Evaluation 1 image 18 - quochung.cyou PTIT](https://quochung.cyou/wp-content/uploads/2025/06/image-18-150x150.png)
![[SWE học A.I] Phần 7: Overfit & Underfit, Tradeoff của Variance/Bias 2 image 63 - quochung.cyou PTIT](https://quochung.cyou/wp-content/uploads/2025/06/image-63-150x150.png)
![[SWE học A.I] Phần 6: Machine Learning Classification 3 image 13 - quochung.cyou PTIT](https://quochung.cyou/wp-content/uploads/2025/06/image-13-150x150.png)
![[SWE học A.I] Phần 4: Data Prepare & Cleaning 4 image 71 - quochung.cyou PTIT](https://quochung.cyou/wp-content/uploads/2025/06/image-71-150x150.png)
![[SWE học A.I] Phần 3: Một số khái niệm suất thống kê 5 image 44 - quochung.cyou PTIT](https://quochung.cyou/wp-content/uploads/2025/06/image-44-150x150.png)
![[SWE học A.I] Phần 2: Một số khái niệm toán học 6 image - quochung.cyou PTIT](https://quochung.cyou/wp-content/uploads/2025/06/image-150x150.png)
![[SWE học A.I] Phần 1: Sơ lược tiếp cận các mô hình A.I 7 image 14 - quochung.cyou PTIT](https://quochung.cyou/wp-content/uploads/2025/05/image-14-150x150.png)


![[SWE học A.I] Phần 8: Model Training & Evaluation 70 image 18 - quochung.cyou PTIT](https://quochung.cyou/wp-content/uploads/2025/06/image-18.png)
![[SWE học A.I] Phần 7: Overfit & Underfit, Tradeoff của Variance/Bias 71 image 63 - quochung.cyou PTIT](https://quochung.cyou/wp-content/uploads/2025/06/image-63.png)
![[SWE học A.I] Phần 6: Machine Learning Classification 72 image 13 - quochung.cyou PTIT](https://quochung.cyou/wp-content/uploads/2025/06/image-13.png)
![[SWE học A.I] Phần 4: Data Prepare & Cleaning 73 image 71 - quochung.cyou PTIT](https://quochung.cyou/wp-content/uploads/2025/06/image-71.png)