Following this official document from Google: https://developers.google.com/api-client-library/java/google-api-java-client/oauth2
When integrating Google OAuth 2.0 with your Spring Boot application, the official documentation provides a comprehensive guide to leverage the GoogleCredential utility class for seamless and secure authorization. OAuth 2.0 is the industry standard for granting access to protected resources, and Google’s implementation is tailored to support various application types, ensuring flexibility across client environments.
Why OAuth 2.0 Matters
Imagine you’re building a task management application that needs to interact with a user’s Google Tasks data. OAuth 2.0 allows your app to request access only to the necessary data (e.g., “Manage your tasks”) while ensuring that the user maintains control over their privacy. The process generates an access token, which is a digital key tied specifically to your application and the user’s data. This token is scoped, meaning it limits the type and extent of access granted, thereby enhancing security. For instance, even if the token were somehow exposed, it couldn’t be used to access unrelated data like emails or photos.
Built on a Secure Foundation
The Google API Client Library for Java includes robust OAuth 2.0 packages such as:
com.google.api.client.googleapis.auth.oauth2: Core classes for implementing OAuth 2.0 flows.com.google.api.client.googleapis.extensions.appengine.auth.oauth2: Specialized extensions for applications hosted on Google App Engine.
These packages are built on the Google OAuth 2.0 Client Library for Java, a general-purpose library offering standardized utilities to handle token acquisition, refresh, and expiration seamlessly.
A Real-World Perspective
Consider an example where a SaaS platform integrates with Google Drive to allow users to upload documents directly from their accounts. With OAuth 2.0, users authenticate their Google accounts through a secure flow, and the platform receives an access token to interact with Google Drive APIs. Instead of continuously requesting sensitive credentials, the platform uses this token to upload or retrieve files, keeping user data secure and operations streamlined.
By utilizing the detailed guidelines in Google’s documentation, you can ensure that your Spring Boot application adheres to best practices for secure OAuth 2.0 integration, offering a smooth user experience while protecting sensitive information.
Acquiring the Client Secret File
To begin integrating Google OAuth 2.0 into your application, the first crucial step is setting up a project on the Google API Console. This console serves as the central hub for managing authorization credentials, configuring API access, and ensuring proper billing setup. Whether your application runs on a web server, mobile device, desktop client, or directly in a browser, this setup process is essential.
Setting Up Credentials
Navigate to the Google API Console and create a new project. Once the project is set up, you can enable the desired APIs and generate the OAuth 2.0 client credentials, which include:
- Client ID: Uniquely identifies your application during the authorization process.
- Client Secret: A sensitive key used to authenticate your application, ensuring secure communication with Google’s servers.
- Redirect URIs: Specify where Google will send users after they complete the authorization flow.
For detailed guidance on configuring these elements, refer to the API Console Help.
Setup a Authorization code flow
Use the authorization code flow to allow the end-user to grant your application access to their protected data on Google APIs. The protocol for this flow is specified in Authorization Code Grant.
This flow is implemented using GoogleAuthorizationCodeFlow. The steps are:
- End-user logs in to your application. You will need to associate that user with a user ID that is unique for your application.
- Call AuthorizationCodeFlow.loadCredential(String)) based on the user ID to check if the end-user’s credentials are already known. If so, we’re done.
- If not, call AuthorizationCodeFlow.newAuthorizationUrl() and direct the end-user’s browser to an authorization page to grant your application access to their protected data.
- The Google authorization server will then redirect the browser back to the redirect URL specified by your application, along with a
codequery parameter. Use thecodeparameter to request an access token using AuthorizationCodeFlow.newTokenRequest(String)). - Use AuthorizationCodeFlow.createAndStoreCredential(TokenResponse, String)) to store and obtain a credential for accessing protected resources.
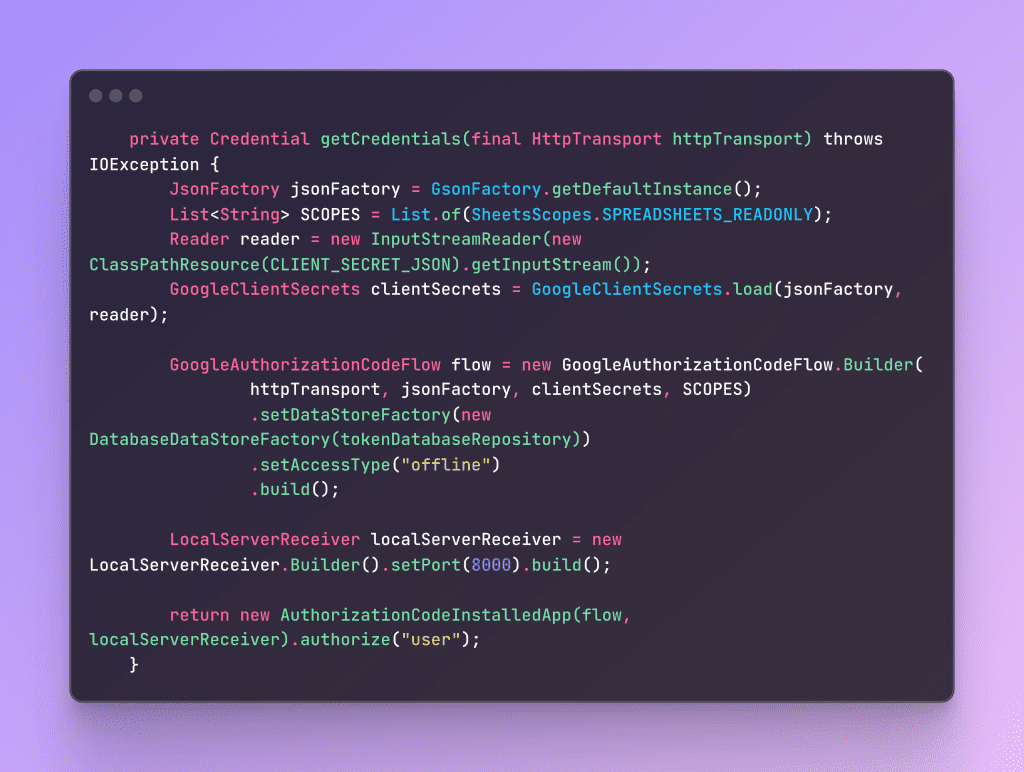
Code implementation is like this

Understanding the DataStoreFactory in GoogleAuthorizationCodeFlow.Builder
When constructing a GoogleAuthorizationCodeFlow object, one of the essential components is the DataStoreFactory. This factory is responsible for persisting user credentials securely and efficiently. Google provides three types of built-in implementations, each suited for different use cases:
- AppEngineDataStoreFactory: persists the credential using the Google App Engine Data Store API.
- MemoryDataStoreFactory: “persists” the credential in memory, which is only useful as a short-term storage for the lifetime of the process.
- FileDataStoreFactory: persists the credential in a file.
Implementing a Custom Data Store to Persist Tokens in a Database
To persist OAuth2 tokens in a database, we need to create a custom implementation of the DataStoreFactory and DataStore classes provided by Google’s OAuth2 library. Here’s a step-by-step guide:
Step 1: Create a Custom DataStoreFactory
The custom factory is responsible for creating instances of your DataStore. Extend AbstractDataStoreFactory to implement this logic.
import com.google.api.client.util.store.AbstractDataStoreFactory;
import com.google.api.client.util.store.DataStore;

import java.io.IOException;
import java.io.Serializable;

public class DatabaseDataStoreFactory extends AbstractDataStoreFactory {

    private TokenDatabaseRepository tokenDatabaseRepository;

    public DatabaseDataStoreFactory(TokenDatabaseRepository tokenDatabaseRepository) {
        this.tokenDatabaseRepository = tokenDatabaseRepository;
    }

    @Override
    protected <V extends Serializable> DataStore<V> createDataStore(String id) throws IOException {
        return new DatabaseDataStore<>(this, id, tokenDatabaseRepository);
    }
}
Step 2: Implement the Custom DataStore
This class handles token persistence logic. Extend AbstractDataStore and implement the required methods like set(), get(), delete(), etc.
import com.google.api.client.util.store.AbstractDataStore;
import com.google.api.client.util.store.DataStore;
import com.google.api.client.util.store.DataStoreFactory;

import java.io.IOException;
import java.io.Serializable;
import java.util.Collection;
import java.util.Set;

public class DatabaseDataStore<V extends Serializable> extends AbstractDataStore<V> {

    private final TokenDatabaseRepository<V> tokenDatabaseRepository;

    protected DatabaseDataStore(DataStoreFactory dataStoreFactory, String id, TokenDatabaseRepository<V> tokenDatabaseRepository) {
        super(dataStoreFactory, id);
        this.tokenDatabaseRepository = tokenDatabaseRepository;
    }

    @Override
    public int size() throws IOException {
        return tokenDatabaseRepository.size();
    }

    @Override
    public boolean isEmpty() throws IOException {
        return tokenDatabaseRepository.isEmpty();
    }

    @Override
    public boolean containsKey(String key) {
        return tokenDatabaseRepository.containsKey(key);
    }

    @Override
    public boolean containsValue(V value) {
        return tokenDatabaseRepository.containsValue(value);
    }

    @Override
    public Set<String> keySet() throws IOException {
        return tokenDatabaseRepository.keySet();
    }

    @Override
    public Collection<V> values() throws IOException {
        return tokenDatabaseRepository.values();
    }

    @Override
    public V get(String key) throws IOException {
        return tokenDatabaseRepository.get(key);
    }

    @Override
    public DataStore<V> set(String key, V value) throws IOException {
        tokenDatabaseRepository.set(key, value);
        return this;
    }

    @Override
    public DataStore<V> clear() {
        tokenDatabaseRepository.clear();
        return this;
    }

    @Override
    public DataStore<V> delete(String key) throws IOException {
        tokenDatabaseRepository.delete(key);
        return this;
    }
}
Step 3: Create the TokenRepository Interface
Leverage Spring Data JPA to handle database interactions.
public interface TokenDatabaseRepository<V> {
    int size();

    boolean isEmpty();

    boolean containsKey(String key);

    boolean containsValue(V value);

    Set<String> keySet();

    Collection<V> values();

    V get(String key);

    TokenDatabaseRepository<V> set(String key, V value);

    TokenDatabaseRepository<V> clear();

    void delete(String key);


}
@Repository
@RequiredArgsConstructor
public class TokenDatabaseRepositoryImpl implements TokenDatabaseRepository<StoredCredential> {

    private final TokenRepositorySql tokenRepositorySql;
    private final GoogleAuthItemMapper googleAuthItemMapper;

    @Override
    public int size() {
        return (int) tokenRepositorySql.count();
    }

    @Override
    public boolean isEmpty() {
        return tokenRepositorySql.count() == 0;
    }

    @Override
    public boolean containsKey(String key) {
        return tokenRepositorySql.existsByKey(key);
    }

    @Override
    public boolean containsValue(StoredCredential value) {
        var googleAuthItem = googleAuthItemMapper.from(value);
        return tokenRepositorySql.existsByAccessTokenAndRefreshToken(googleAuthItem.getAccessToken(), googleAuthItem.getRefreshToken());
    }

    @Override
    public Set<String> keySet() {
        return tokenRepositorySql.findAll().stream()
                .map(GoogleAuthItem::getKey)
                .collect(Collectors.toSet());
    }

    @Override
    public Collection<StoredCredential> values() {
        return tokenRepositorySql.findAll().stream()
                .map(googleAuthItemMapper::to)
                .collect(Collectors.toList());
    }

    @Override
    public StoredCredential get(String key) {
        Optional<GoogleAuthItem> optionalGoogleAuthItem = tokenRepositorySql.findById(key);
        return optionalGoogleAuthItem.map(googleAuthItemMapper::to).orElse(null);
    }

    @Override
    @Transactional
    public TokenDatabaseRepository<StoredCredential> set(String key, StoredCredential value) {
        var googleAuthItem = googleAuthItemMapper.from(value);
        googleAuthItem.setKey(key);
        tokenRepositorySql.save(googleAuthItem);
        return this;
    }

    @Override
    @Transactional
    public TokenDatabaseRepository<StoredCredential> clear() {
        tokenRepositorySql.deleteAll();
        return this;
    }

    @Override
    public void delete(String key) {
        tokenRepositorySql.deleteByKey(key);
    }
}
public interface TokenRepositorySql extends JpaRepository<GoogleAuthItem, String> {

    boolean existsByKey(String key);

    boolean existsByAccessTokenAndRefreshToken(String accessToken, String refreshToken);

    void deleteByKey(String key);

}
![[SWE học A.I] Phần 8: Model Training & Evaluation 1 image 18 - quochung.cyou PTIT](https://quochung.cyou/wp-content/uploads/2025/06/image-18-150x150.png)
![[SWE học A.I] Phần 7: Overfit & Underfit, Tradeoff của Variance/Bias 2 image 63 - quochung.cyou PTIT](https://quochung.cyou/wp-content/uploads/2025/06/image-63-150x150.png)
![[SWE học A.I] Phần 6: Machine Learning Classification 3 image 13 - quochung.cyou PTIT](https://quochung.cyou/wp-content/uploads/2025/06/image-13-150x150.png)
![[SWE học A.I] Phần 4: Data Prepare & Cleaning 4 image 71 - quochung.cyou PTIT](https://quochung.cyou/wp-content/uploads/2025/06/image-71-150x150.png)
![[SWE học A.I] Phần 3: Một số khái niệm suất thống kê 5 image 44 - quochung.cyou PTIT](https://quochung.cyou/wp-content/uploads/2025/06/image-44-150x150.png)
![[SWE học A.I] Phần 2: Một số khái niệm toán học 6 image - quochung.cyou PTIT](https://quochung.cyou/wp-content/uploads/2025/06/image-150x150.png)
![[SWE học A.I] Phần 1: Sơ lược tiếp cận các mô hình A.I 7 image 14 - quochung.cyou PTIT](https://quochung.cyou/wp-content/uploads/2025/05/image-14-150x150.png)


![[SWE học A.I] Phần 8: Model Training & Evaluation 26 image 18 - quochung.cyou PTIT](https://quochung.cyou/wp-content/uploads/2025/06/image-18.png)
![[SWE học A.I] Phần 7: Overfit & Underfit, Tradeoff của Variance/Bias 27 image 63 - quochung.cyou PTIT](https://quochung.cyou/wp-content/uploads/2025/06/image-63.png)
![[SWE học A.I] Phần 6: Machine Learning Classification 28 image 13 - quochung.cyou PTIT](https://quochung.cyou/wp-content/uploads/2025/06/image-13.png)
![[SWE học A.I] Phần 4: Data Prepare & Cleaning 29 image 71 - quochung.cyou PTIT](https://quochung.cyou/wp-content/uploads/2025/06/image-71.png)