Tối ưu SEO website CSR (React, Angular) bằng kĩ thuật PreCrawl

Gần đây, mình có phải gặp một bài toán khá hay, với nhu cầu là thiết kế một blog với 3 tiêu chí

  • Quản Lý Nội Dung Động: Các bài viết, tag, category cần được động, có thể quản lý (thêm sửa xoá mới) hoàn toàn trên giao diện để cho những người không rành về công nghệ cũng có thể vận hành được
  • Miễn phí: Quan trọng nhất, không được mất phí cho bất kì phần nào của hệ thống, đây là yêu cầu quan trọng nhất, vì cái này sẽ phục vụ cho 1 số tổ chức có kinh phí eo hẹp, hoặc cho cá nhân viết blog theo sở thích, … và không mong muốn chi thêm 1 khoản phí cho website (tất nhiên là không tính tới domain)
  • SEO: Website phải tốt cho SEO

Disclaimer: Đây không phải là một bài toán của blog mình, hiện tại blog của mình đang sử dụng WordPress, và nó tốn chi phí hàng tháng, nhưng cũng đáp ứng đủ các nhu cầu của mình.

Nếu cần Solution tối ưu nhất, hãy đi đến hướng đi cuối

Hướng đi 1: Static Site Generator (SSG)

Hướng tiếp cận đầu tiên của mình là sử dụng 1 opensource sinh ra các trang tĩnh cho blog, sau đó deploy bản được build ra lên một số trang cho host trang tĩnh miễn phí như Firebase Hosting, Github Page, …

Giải pháp này thì đã có rất nhiều open source, bạn có thể tham khảo tại đây, dưới mục Blog: https://github.com/myles/awesome-static-generators#blogs

Nhìn chung luồng này sẽ dạng như sau

  • Người dùng sẽ viết bài ở dạng Markdown, hoặc có thể là viết ở Notion, …
  • Sẽ cần 1 cái gì đó trigger thực hiện build khi viết bài xong, có thể là ci/cd tự động khi push markdown ở github, hoặc ở notion có lắng nghe sự kiện
  • Lúc này hệ thống sẽ build ra bản trang tĩnh, và có thể được deploy lên các trang hosting cho phép deploy trang tĩnh
image - quochung.cyou PTIT
image 1 - quochung.cyou PTIT
  • Ví dụ: Hexo – Viết các file markdown, khi chạy generate sẽ sinh folder build
  • …

Pros

  • Miễn phí
  • SEO tốt
  • Có thể viết động, người dùng vận hành vào viết bài được nếu mà CI-CD đã làm hết -> Tuy nhiên vẫn chưa ở mức cao nhất là có trang quản lý riêng như mong muốn ban đầu lắm

Cons:

  • Đa số các giải pháp đều cần build lại ra trang tĩnh mỗi lần sửa đổi, và khi số lượng bài viết tăng lên thì càng tốn thời gian hơn.
  • Khi cần sửa đổi bài viết, thêm bài viết đều cần build lại, chưa thể vào xem thử tức thì
  • Chưa có giao diện quản lý trực quan

Hướng đi 2: NextJS

Một hướng đi thứ 2 để tối ưu SEO là sử dụng 1 framework server side rendering, có khá nhiều framework như vậy. Điển hình là NextJS.

Ta có thể sử dụng 1 database miễn phí, query bằng api để hỗ trợ trang web động.

Tuy nhiên NextJS nếu muốn build ra các dạng trang tĩnh, để có thể deploy free trên các trang host tĩnh như Github Page, Firebase Hosting, …. thì bắt buộc sẽ cần render toàn bộ trước.

Cụ thể sẽ cần sử dụng  getStaticPaths, và lúc thời điểm build ra bản output, thì sẽ cần query toàn bộ bài viết ở database, và build.

image 2 - quochung.cyou PTIT

Pros

  • Miễn phí
  • SEO tốt
  • Có thể viết động, chỉnh sửa động bằng giao diện do có thể code call api vào database động

Cons:

  • Thời gian build cực kì lâu, vì đa số các hosting free static site sẽ xoá toàn bộ file mỗi lần upload lên, và mỗi lần build thì cần build toàn bộ.

Hướng đi 3 – Solution: Pre-Crawl

Ở cách làm này, ta sẽ sử dụng CSR truyền thống để khi người dùng lướt web, sẽ đọc bài viết, dữ liệu được load động từ API. Và việc tạo bài viết, chuyên mục, … được admin vận hành tạo từ trang quản trị, cũng sẽ thực hiện qua API Database, ở đây sử dụng API Supabase

Mấu chốt là ví dụ như nếu sử dụng React, thì SEO sẽ rất kém, vì React đi theo dạng sử dụng đa số là JS và để JS build ra HTML. Nên các bot crawl của Google, Bing, … khi vào trang web nếu không chạy được js sẽ không load ra dữ liệu gì cả

Ví dụ hình ảnh một trang web sử dụng CSR sẽ trông như nào với Bot qua http://botsimulator.com/:

  • Kết quả nhận được, bot không lấy được dữ liệu gì cả, chỉ có tên trang web, keyword, desc, … đều rỗng
image 3 - quochung.cyou PTIT
image 5 - quochung.cyou PTIT

Phương án đề ra là ta sẽ sử dụng một luồng nghiệp vụ khác, riêng biệt, chuyên thực hiện việc đi vào các trang web như người dùng mở browser vào web vậy, sau đó cache lại các dữ liệu html vào 1 trang lưu tĩnh, lúc này khi Bot tới, ta sẽ có 1 tầng proxy kiểm tra xem có phải là Bot không, và redirect Bot sang trang tĩnh html đã được xử lý xong, còn người dùng thì đi luồng thông thường.

Có thể nhìn biểu đồ sau với các công nghệ sử dụng:

  • Proxy bên trên xử lý redirect: Cloudflare Worker Route + Cloudflare Worker
  • Lưu trữ HTML: Supabase Storage
  • Trang tĩnh: lưu trữ tại Cloudflare Page, dev bằng React
  • Thực hiện crawl trang web: Github Action
  • Database + API động bài viết: Supabase Database
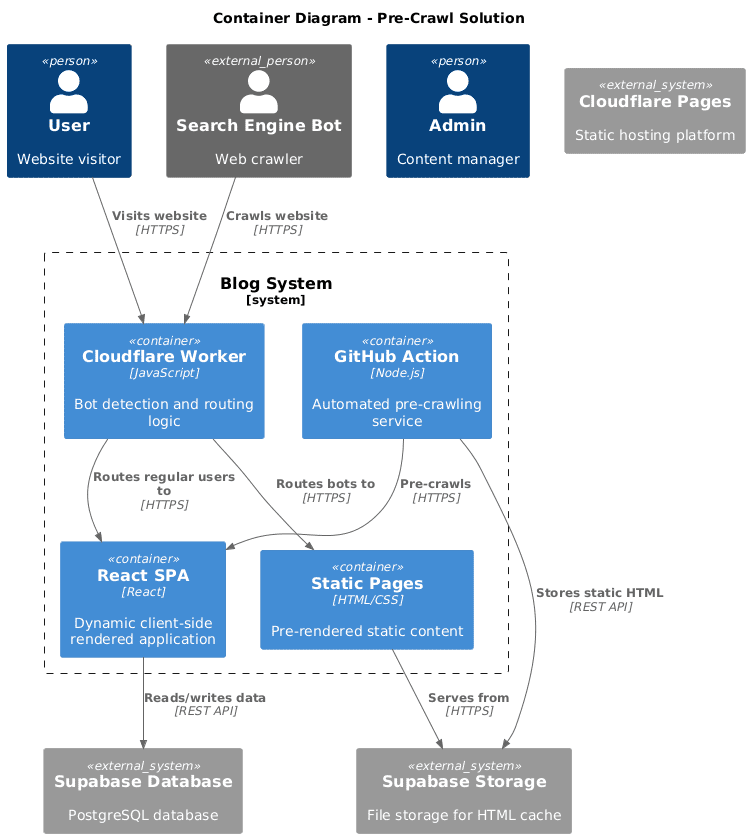
image 7 - quochung.cyou PTIT

Kết quả nhận được:

  • Bot sẽ crawl được các dữ liệu trong bài viết (Trong ảnh ở phần Indexable Page Text)
image 4 - quochung.cyou PTIT
image 6 - quochung.cyou PTIT

Pros

  • Miễn phí
  • SEO tốt
  • Có thể viết động, chỉnh sửa động bằng giao diện do có thể code call api vào database động
  • Build nhanh, do trang build ra là trang csr chỉ chứa code call api cho user <- Xử lý được hướng đi 1,2

Cons:

  • Sẽ cần flow crawl dữ liệu, cái này thì có thể chạy bằng manual cũng được, mình sử dụng 1 workflow trên Github Action để crawl, Github Action sẽ free 2200 phút / tháng (khoảng chạy được 1 tiếng /ngày, vì vậy sẽ cần triển khai logic dạng kiểm tra có nên crawl lại 1 trang không bằng thời gian cập nhật, … tuỳ vào nghiệp vụ)
Code triển khai + chi tiết setup với techstack bên trên

https://github.com/quochung-cyou/csr-seo-page-crawl

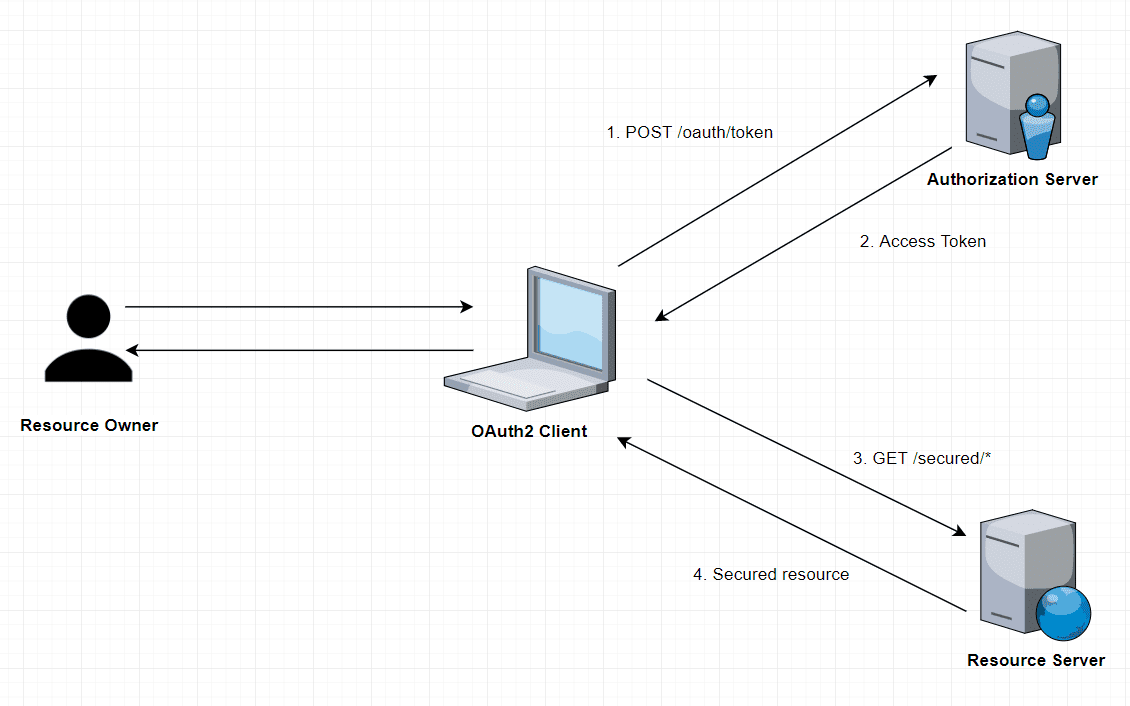
Save Google OAuth2 token in database with Spring Boot

Following this official document from Google: https://developers.google.com/api-client-library/java/google-api-java-client/oauth2

When integrating Google OAuth 2.0 with your Spring Boot application, the official documentation provides a comprehensive guide to leverage the GoogleCredential utility class for seamless and secure authorization. OAuth 2.0 is the industry standard for granting access to protected resources, and Google’s implementation is tailored to support various application types, ensuring flexibility across client environments.

Why OAuth 2.0 Matters

Imagine you’re building a task management application that needs to interact with a user’s Google Tasks data. OAuth 2.0 allows your app to request access only to the necessary data (e.g., “Manage your tasks”) while ensuring that the user maintains control over their privacy. The process generates an access token, which is a digital key tied specifically to your application and the user’s data. This token is scoped, meaning it limits the type and extent of access granted, thereby enhancing security. For instance, even if the token were somehow exposed, it couldn’t be used to access unrelated data like emails or photos.

Built on a Secure Foundation

The Google API Client Library for Java includes robust OAuth 2.0 packages such as:

  • com.google.api.client.googleapis.auth.oauth2: Core classes for implementing OAuth 2.0 flows.
  • com.google.api.client.googleapis.extensions.appengine.auth.oauth2: Specialized extensions for applications hosted on Google App Engine.

These packages are built on the Google OAuth 2.0 Client Library for Java, a general-purpose library offering standardized utilities to handle token acquisition, refresh, and expiration seamlessly.

A Real-World Perspective

Consider an example where a SaaS platform integrates with Google Drive to allow users to upload documents directly from their accounts. With OAuth 2.0, users authenticate their Google accounts through a secure flow, and the platform receives an access token to interact with Google Drive APIs. Instead of continuously requesting sensitive credentials, the platform uses this token to upload or retrieve files, keeping user data secure and operations streamlined.

By utilizing the detailed guidelines in Google’s documentation, you can ensure that your Spring Boot application adheres to best practices for secure OAuth 2.0 integration, offering a smooth user experience while protecting sensitive information.

Acquiring the Client Secret File

To begin integrating Google OAuth 2.0 into your application, the first crucial step is setting up a project on the Google API Console. This console serves as the central hub for managing authorization credentials, configuring API access, and ensuring proper billing setup. Whether your application runs on a web server, mobile device, desktop client, or directly in a browser, this setup process is essential.

Setting Up Credentials

Navigate to the Google API Console and create a new project. Once the project is set up, you can enable the desired APIs and generate the OAuth 2.0 client credentials, which include:

  • Client ID: Uniquely identifies your application during the authorization process.
  • Client Secret: A sensitive key used to authenticate your application, ensuring secure communication with Google’s servers.
  • Redirect URIs: Specify where Google will send users after they complete the authorization flow.

For detailed guidance on configuring these elements, refer to the API Console Help.

Setup a Authorization code flow

Use the authorization code flow to allow the end-user to grant your application access to their protected data on Google APIs. The protocol for this flow is specified in Authorization Code Grant.

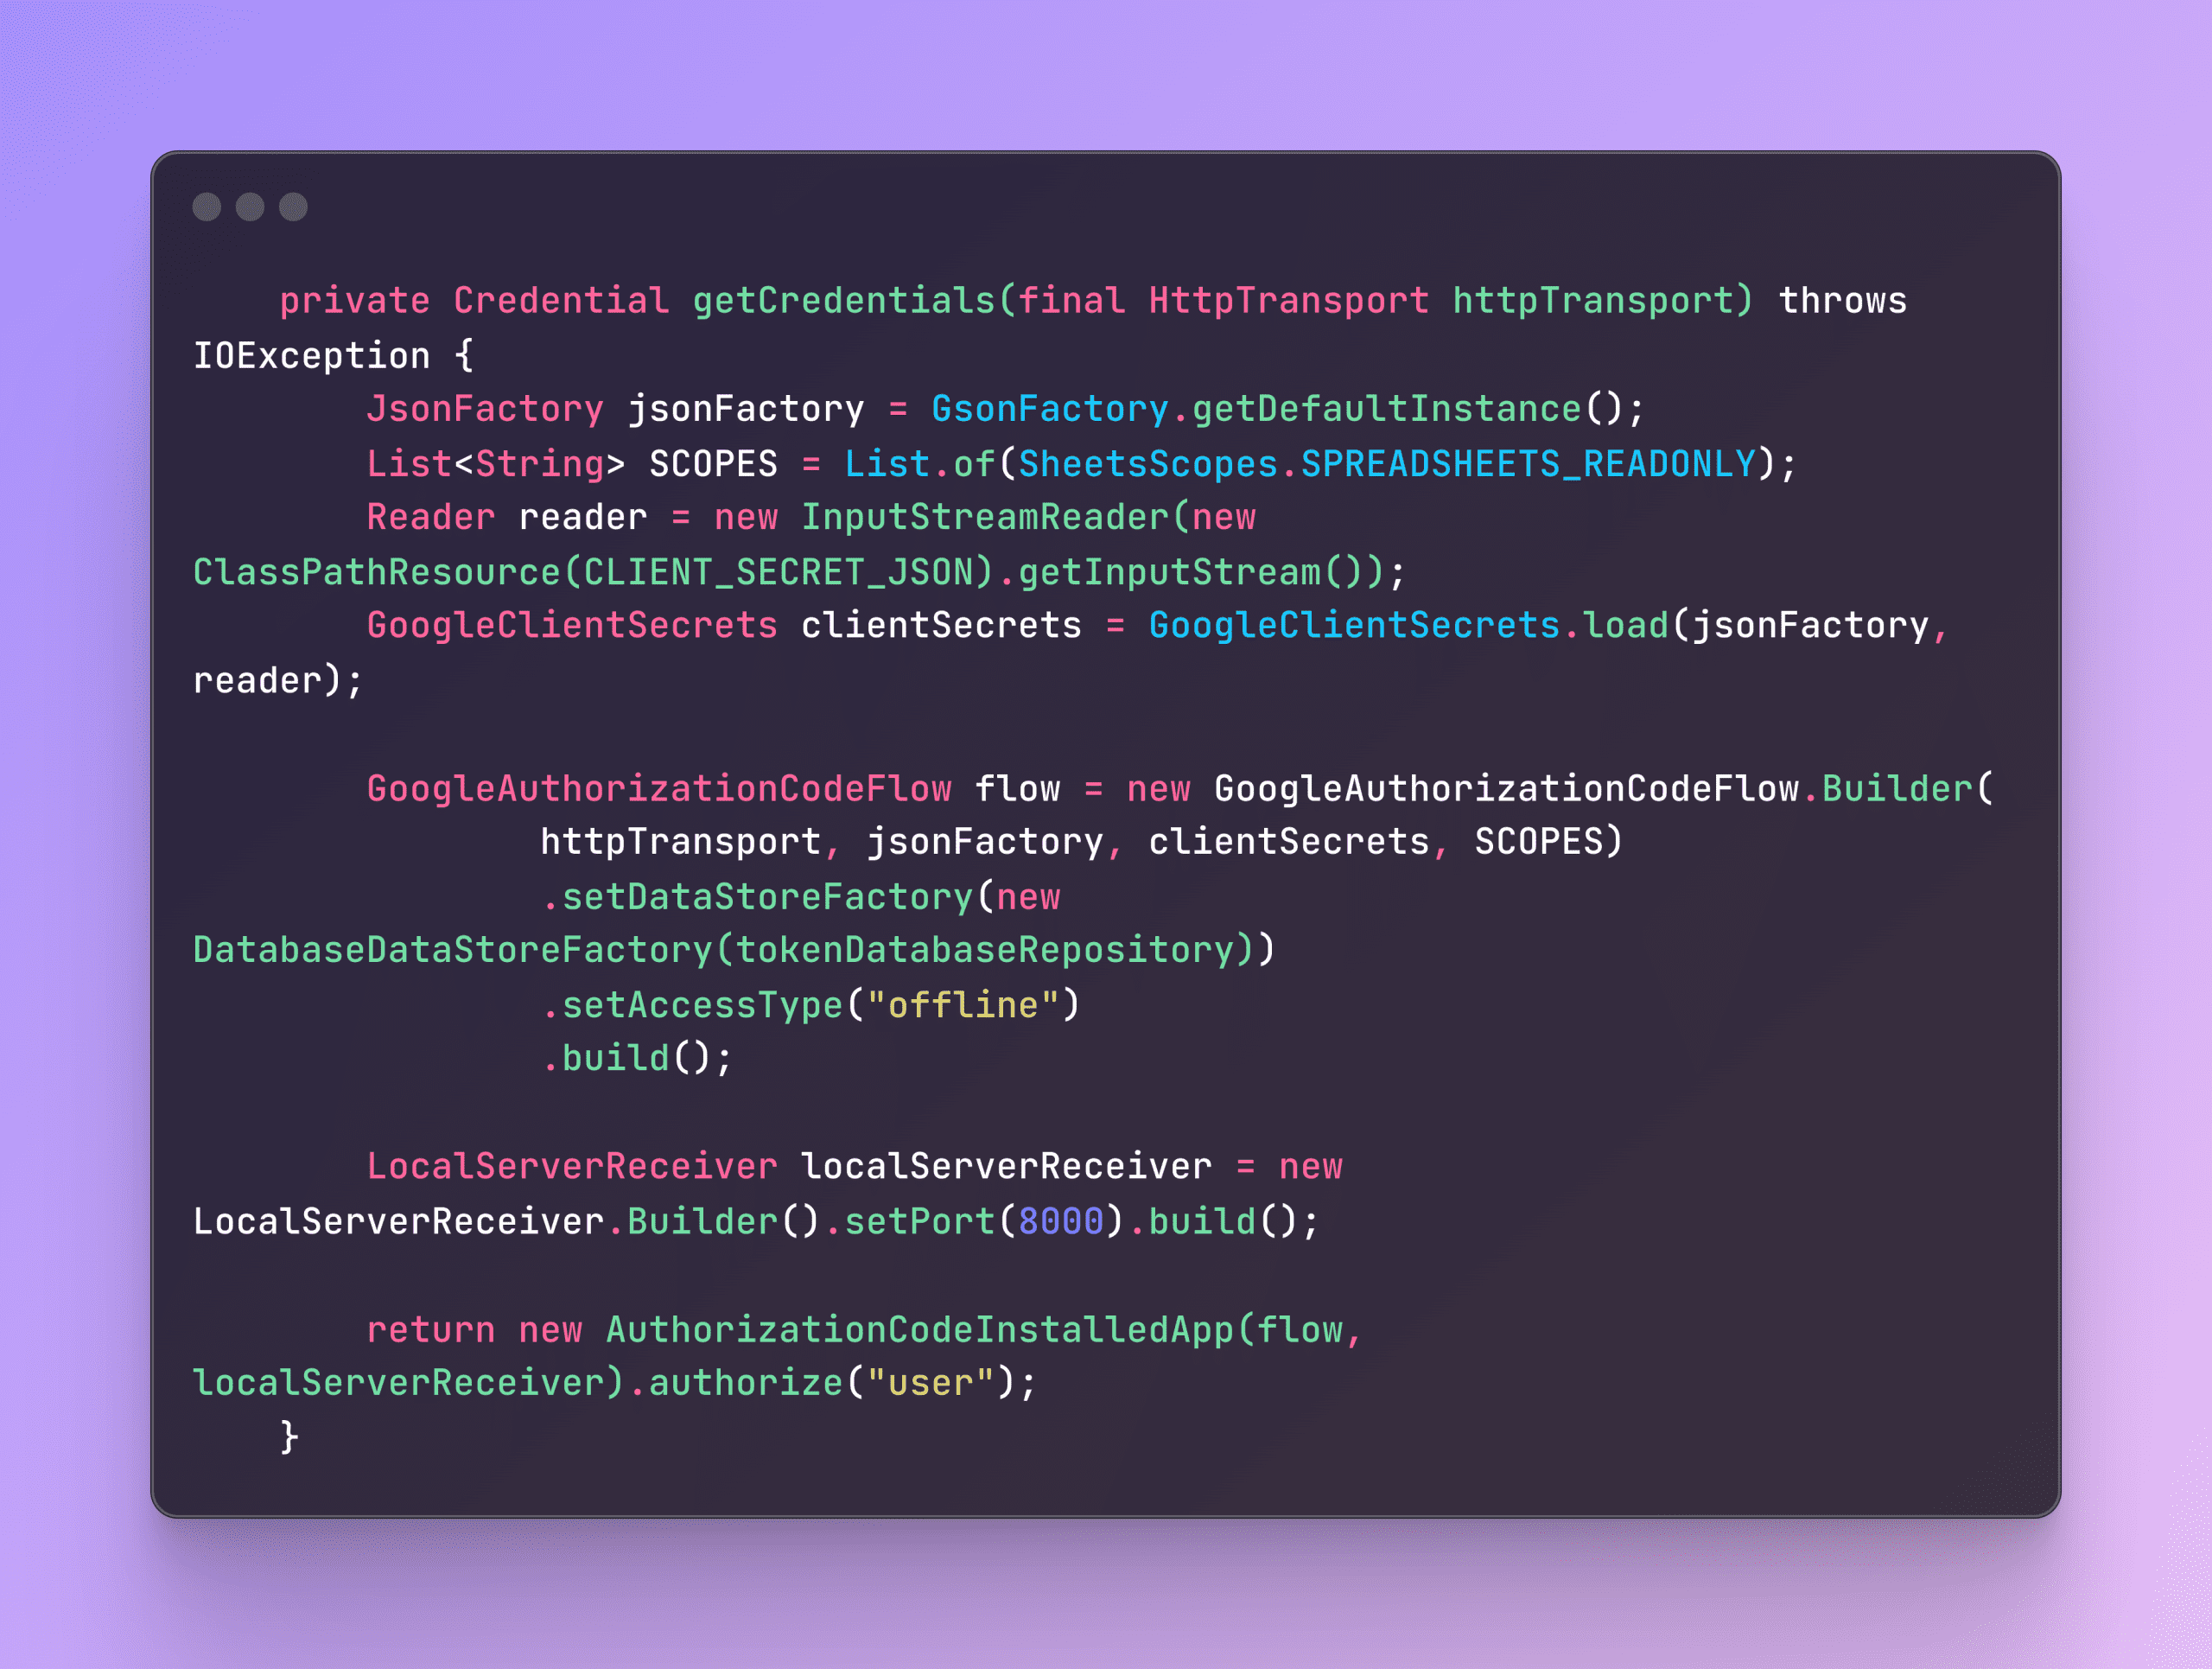
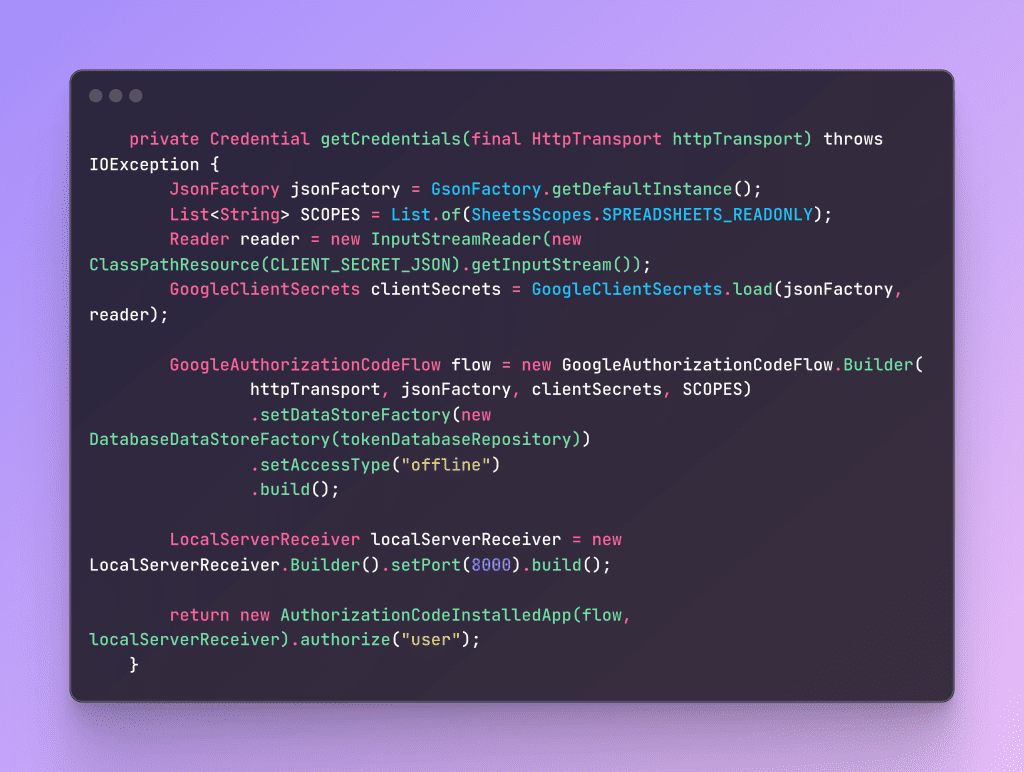
This flow is implemented using GoogleAuthorizationCodeFlow. The steps are:

Code implementation is like this

image - quochung.cyou PTIT

Understanding the DataStoreFactory in GoogleAuthorizationCodeFlow.Builder

When constructing a GoogleAuthorizationCodeFlow object, one of the essential components is the DataStoreFactory. This factory is responsible for persisting user credentials securely and efficiently. Google provides three types of built-in implementations, each suited for different use cases:

Implementing a Custom Data Store to Persist Tokens in a Database

To persist OAuth2 tokens in a database, we need to create a custom implementation of the DataStoreFactory and DataStore classes provided by Google’s OAuth2 library. Here’s a step-by-step guide:


Step 1: Create a Custom DataStoreFactory

The custom factory is responsible for creating instances of your DataStore. Extend AbstractDataStoreFactory to implement this logic.

Java
import com.google.api.client.util.store.AbstractDataStoreFactory;
import com.google.api.client.util.store.DataStore;

import java.io.IOException;
import java.io.Serializable;

public class DatabaseDataStoreFactory extends AbstractDataStoreFactory {

    private TokenDatabaseRepository tokenDatabaseRepository;

    public DatabaseDataStoreFactory(TokenDatabaseRepository tokenDatabaseRepository) {
        this.tokenDatabaseRepository = tokenDatabaseRepository;
    }

    @Override
    protected <V extends Serializable> DataStore<V> createDataStore(String id) throws IOException {
        return new DatabaseDataStore<>(this, id, tokenDatabaseRepository);
    }
}

Step 2: Implement the Custom DataStore

This class handles token persistence logic. Extend AbstractDataStore and implement the required methods like set(), get(), delete(), etc.

Java
import com.google.api.client.util.store.AbstractDataStore;
import com.google.api.client.util.store.DataStore;
import com.google.api.client.util.store.DataStoreFactory;

import java.io.IOException;
import java.io.Serializable;
import java.util.Collection;
import java.util.Set;

public class DatabaseDataStore<V extends Serializable> extends AbstractDataStore<V> {

    private final TokenDatabaseRepository<V> tokenDatabaseRepository;

    protected DatabaseDataStore(DataStoreFactory dataStoreFactory, String id, TokenDatabaseRepository<V> tokenDatabaseRepository) {
        super(dataStoreFactory, id);
        this.tokenDatabaseRepository = tokenDatabaseRepository;
    }

    @Override
    public int size() throws IOException {
        return tokenDatabaseRepository.size();
    }

    @Override
    public boolean isEmpty() throws IOException {
        return tokenDatabaseRepository.isEmpty();
    }

    @Override
    public boolean containsKey(String key) {
        return tokenDatabaseRepository.containsKey(key);
    }

    @Override
    public boolean containsValue(V value) {
        return tokenDatabaseRepository.containsValue(value);
    }

    @Override
    public Set<String> keySet() throws IOException {
        return tokenDatabaseRepository.keySet();
    }

    @Override
    public Collection<V> values() throws IOException {
        return tokenDatabaseRepository.values();
    }

    @Override
    public V get(String key) throws IOException {
        return tokenDatabaseRepository.get(key);
    }

    @Override
    public DataStore<V> set(String key, V value) throws IOException {
        tokenDatabaseRepository.set(key, value);
        return this;
    }

    @Override
    public DataStore<V> clear() {
        tokenDatabaseRepository.clear();
        return this;
    }

    @Override
    public DataStore<V> delete(String key) throws IOException {
        tokenDatabaseRepository.delete(key);
        return this;
    }
}

Step 3: Create the TokenRepository Interface

Leverage Spring Data JPA to handle database interactions.

Java
public interface TokenDatabaseRepository<V> {
    int size();

    boolean isEmpty();

    boolean containsKey(String key);

    boolean containsValue(V value);

    Set<String> keySet();

    Collection<V> values();

    V get(String key);

    TokenDatabaseRepository<V> set(String key, V value);

    TokenDatabaseRepository<V> clear();

    void delete(String key);


}
Java
@Repository
@RequiredArgsConstructor
public class TokenDatabaseRepositoryImpl implements TokenDatabaseRepository<StoredCredential> {

    private final TokenRepositorySql tokenRepositorySql;
    private final GoogleAuthItemMapper googleAuthItemMapper;

    @Override
    public int size() {
        return (int) tokenRepositorySql.count();
    }

    @Override
    public boolean isEmpty() {
        return tokenRepositorySql.count() == 0;
    }

    @Override
    public boolean containsKey(String key) {
        return tokenRepositorySql.existsByKey(key);
    }

    @Override
    public boolean containsValue(StoredCredential value) {
        var googleAuthItem = googleAuthItemMapper.from(value);
        return tokenRepositorySql.existsByAccessTokenAndRefreshToken(googleAuthItem.getAccessToken(), googleAuthItem.getRefreshToken());
    }

    @Override
    public Set<String> keySet() {
        return tokenRepositorySql.findAll().stream()
                .map(GoogleAuthItem::getKey)
                .collect(Collectors.toSet());
    }

    @Override
    public Collection<StoredCredential> values() {
        return tokenRepositorySql.findAll().stream()
                .map(googleAuthItemMapper::to)
                .collect(Collectors.toList());
    }

    @Override
    public StoredCredential get(String key) {
        Optional<GoogleAuthItem> optionalGoogleAuthItem = tokenRepositorySql.findById(key);
        return optionalGoogleAuthItem.map(googleAuthItemMapper::to).orElse(null);
    }

    @Override
    @Transactional
    public TokenDatabaseRepository<StoredCredential> set(String key, StoredCredential value) {
        var googleAuthItem = googleAuthItemMapper.from(value);
        googleAuthItem.setKey(key);
        tokenRepositorySql.save(googleAuthItem);
        return this;
    }

    @Override
    @Transactional
    public TokenDatabaseRepository<StoredCredential> clear() {
        tokenRepositorySql.deleteAll();
        return this;
    }

    @Override
    public void delete(String key) {
        tokenRepositorySql.deleteByKey(key);
    }
}
Java
public interface TokenRepositorySql extends JpaRepository<GoogleAuthItem, String> {

    boolean existsByKey(String key);

    boolean existsByAccessTokenAndRefreshToken(String accessToken, String refreshToken);

    void deleteByKey(String key);

}

Google API – Getting User ID for Google Chat from Google People API

How to Retrieve a Google User ID Using OAuth2 Playground

With OAuth2 Playground, you can securely interact with Google APIs without needing to build the OAuth2 authentication flow from scratch. Here’s a straightforward guide to help you retrieve the Google user ID in just a few steps:

Step 1: Access the Google OAuth2 Playground

Start by visiting the Google OAuth2 Playground. This is a helpful tool for developers who want to explore how Google’s OAuth2 system works and test API calls quickly.

Step 2: Select the People API v1 Scope

To retrieve a user’s ID, you’ll need to access the People API. In the OAuth2 Playground, under Step 1, select the appropriate API scope:

  • Click on “Select & Authorize APIs.”
  • Look for People API v1 and check it.

This API will allow you to access basic user information, including the Google ID.

image - quochung.cyou PTIT

Step 3: Authorize API Access

Once you’ve selected the API scope, click Authorize APIs. You’ll be redirected to a Google login page, where you’ll log in and grant the necessary permissions. This allows the OAuth2 Playground to act on behalf of the user and retrieve data from the People API.

image 1 - quochung.cyou PTIT

Step 4: Exchange Authorization Code for Tokens

After authorization, you’ll receive an authorization code in the Playground. In Step 2, click Exchange authorization code for tokens. This will provide you with an access token, which you’ll use to make authorized API requests.

Now that you have the access token, it’s time to make a request to the People API to get the user’s Google ID. Use the following CURL command in your terminal or directly in the OAuth2 Playground’s built-in HTTP request tool:

Java
curl --location 'https://people.googleapis.com/v1/people:searchDirectoryPeople?query=email_target&readMask=names&sources=DIRECTORY_SOURCE_TYPE_DOMAIN_PROFILE' \
--header 'Content-Type: application/json' \
--header 'Authorization: Bearer your-token-here'

Replace YOUR_ACCESS_TOKEN with the token you obtained in the previous step. This request will return a JSON object with the user’s profile data, including their Google ID.

Dynamic OAuth2 Client for Spring Boot

Introduction

OAuth2 has become the industry standard for secure authorization in web applications. Spring Boot simplifies OAuth2 integration, allowing developers to handle client registration effortlessly. However, Spring Boot’s default implementation often requires client registrations to be predefined in application configuration, making it difficult to adapt to changing environments where client registrations need to be added or removed dynamically.

In this blog post, we’ll explore how to overcome this limitation by creating a custom implementation of ClientRegistrationRepository that allows dynamic management of OAuth2 clients at runtime. This approach provides the flexibility required for modern applications that need to adapt to varying OAuth2 client configurations.

Understanding Spring Boot’s Default Client Registration

Spring Boot manages OAuth2 client registrations using the ClientRegistrationRepository interface, which provides a way to store and retrieve client configurations. By default, Spring Boot offers an InMemoryClientRegistrationRepository implementation. This default implementation stores client registrations in memory, as defined in the application’s configuration files.

While this approach works well for static configurations, it has a significant limitation: the client registrations are immutable. Once registered, a client’s configuration cannot be altered. This is because InMemoryClientRegistrationRepository creates an unmodifiable map of client registrations:

Java
	public InMemoryClientRegistrationRepository(List < ClientRegistration > registrations) {
	    this(createRegistrationsMap(registrations));
	}

	private static Map < String, ClientRegistration > createRegistrationsMap(List < ClientRegistration > registrations) {
	    Assert.notEmpty(registrations, "registrations cannot be empty");
	    return toUnmodifiableConcurrentMap(registrations);
	}

	private static Map < String, ClientRegistration > toUnmodifiableConcurrentMap(List < ClientRegistration > registrations) {
	    ConcurrentHashMap < String, ClientRegistration > result = new ConcurrentHashMap < > ();
	    for (ClientRegistration registration: registrations) {
	        Assert.state(!result.containsKey(registration.getRegistrationId()),
	            () - > String.format("Duplicate key %s", registration.getRegistrationId()));
	        result.put(registration.getRegistrationId(), registration);
	    }
	    return Collections.unmodifiableMap(result);
	}

This immutability is by design, ensuring that client registrations remain consistent throughout the application’s lifecycle. However, for applications that require dynamic updates to client registrations—such as SaaS platforms or systems with evolving client needs—this default behavior is insufficient.

Custom Implementation of ClientRegistrationRepository

To support dynamic client registration, we need to implement a custom version of ClientRegistrationRepository that allows adding and removing clients at runtime. This custom repository will manage a modifiable collection of client registrations.

Here’s how you can create a custom ClientRegistrationRepository:

Java
public class DynamicClientRegistrationRepository implements ClientRegistrationRepository {
    private final ConcurrentHashMap < String, ClientRegistration > clientRegistrations = new ConcurrentHashMap < > ();

    public void addClientRegistration(String registrationId, ClientRegistration registration) {
        clientRegistrations.put(registrationId, registration);
    }

    @Override
    public ClientRegistration findByRegistrationId(String registrationId) {
        return clientRegistrations.get(registrationId);
    }
}

This implementation uses a ConcurrentHashMap to store client registrations, enabling thread-safe access and modification. The addClientRegistration and removeClientRegistration methods allow for dynamic management of client registrations, which can be crucial for applications that need to adapt in real time.

Java
clientRegistrationRepository.addClientRegistration(clientRegistration.getRegistrationId(), clientRegistration);

Integrating Custom ClientRegistrationRepository with Spring Security

After implementing the custom ClientRegistrationRepository, the next step is to integrate it into your Spring Boot application. This involves replacing the default InMemoryClientRegistrationRepository with your custom implementation.

Here’s how to inject your custom repository into the Spring Security configuration:

Java
        OAuth2AuthorizedClientProvider authorizedClientProvider = OAuth2AuthorizedClientProviderBuilder.builder()
            .clientCredentials()
            .build();
        clientRegistrationRepository = new DynamicClientRegistrationRepository();
        clientService = new InMemoryOAuth2AuthorizedClientService(clientRegistrationRepository);
        var clientManager = new AuthorizedClientServiceOAuth2AuthorizedClientManager(
            clientRegistrationRepository, clientService);
        clientManager.setAuthorizedClientProvider(authorizedClientProvider);

By defining the custom ClientRegistrationRepository as a bean, Spring Boot will automatically use it in the OAuth2 flow, allowing for dynamic client management.

Acquiring Access Tokens Using Dynamic Client Registrations

Once you have dynamically registered clients, you can proceed with acquiring access tokens using the standard OAuth2 flow. The process remains unchanged, but now includes the capability to work with clients that were registered dynamically.

Here’s an example of acquiring an access token:

Java
        OAuth2AuthorizeRequest authorizeRequest = OAuth2AuthorizeRequest.withClientRegistrationId(clientRegistration.getRegistrationId())
            .principal(oauth2Config.getClientId())
            .attribute(AuthorizationGrantType.CLIENT_CREDENTIALS.getValue(), clientRegistration)
            .build();
        OAuth2AuthorizedClient authorizedClient = authorizedClientManager.authorize(authorizeRequest);
        authorizedClient.getAccessToken().getTokenValue() //-> get token here

Register a custom function in Camunda 7 with Spring Boot

Introduction to Camunda 7

image 2 - quochung.cyou PTIT

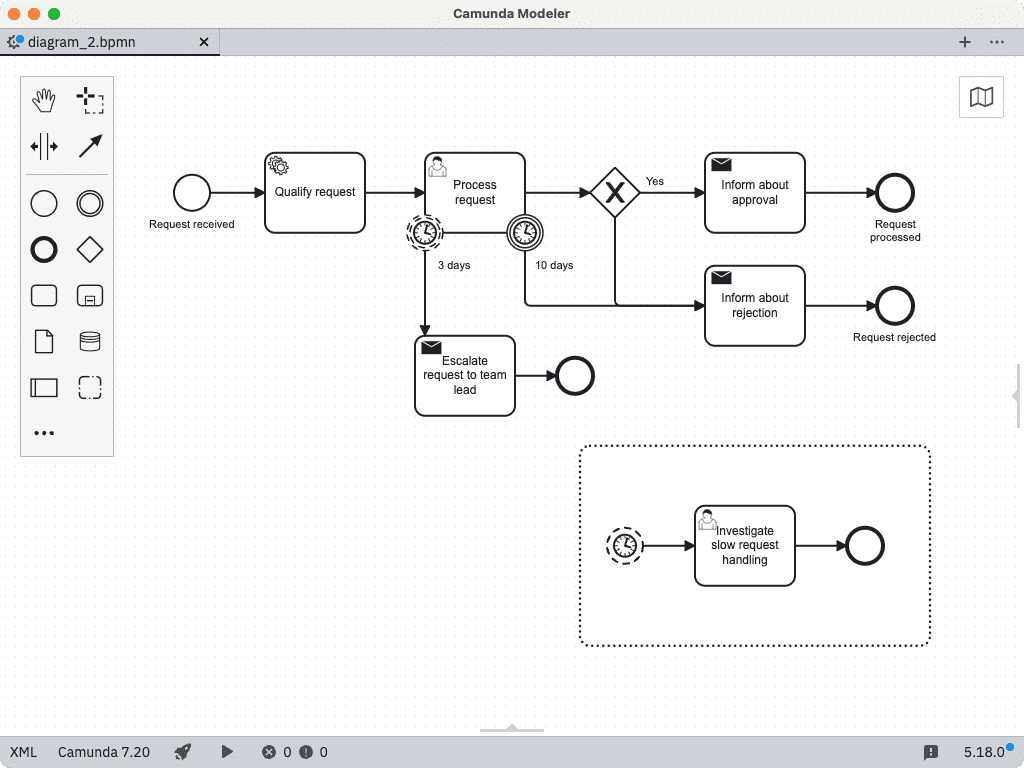
Camunda 7 is a powerful, open-source platform designed for workflow and process automation. It offers a comprehensive suite of tools for managing business processes, including capabilities for modeling, automating, and optimizing workflows.

Before Camunda BPM 7.18

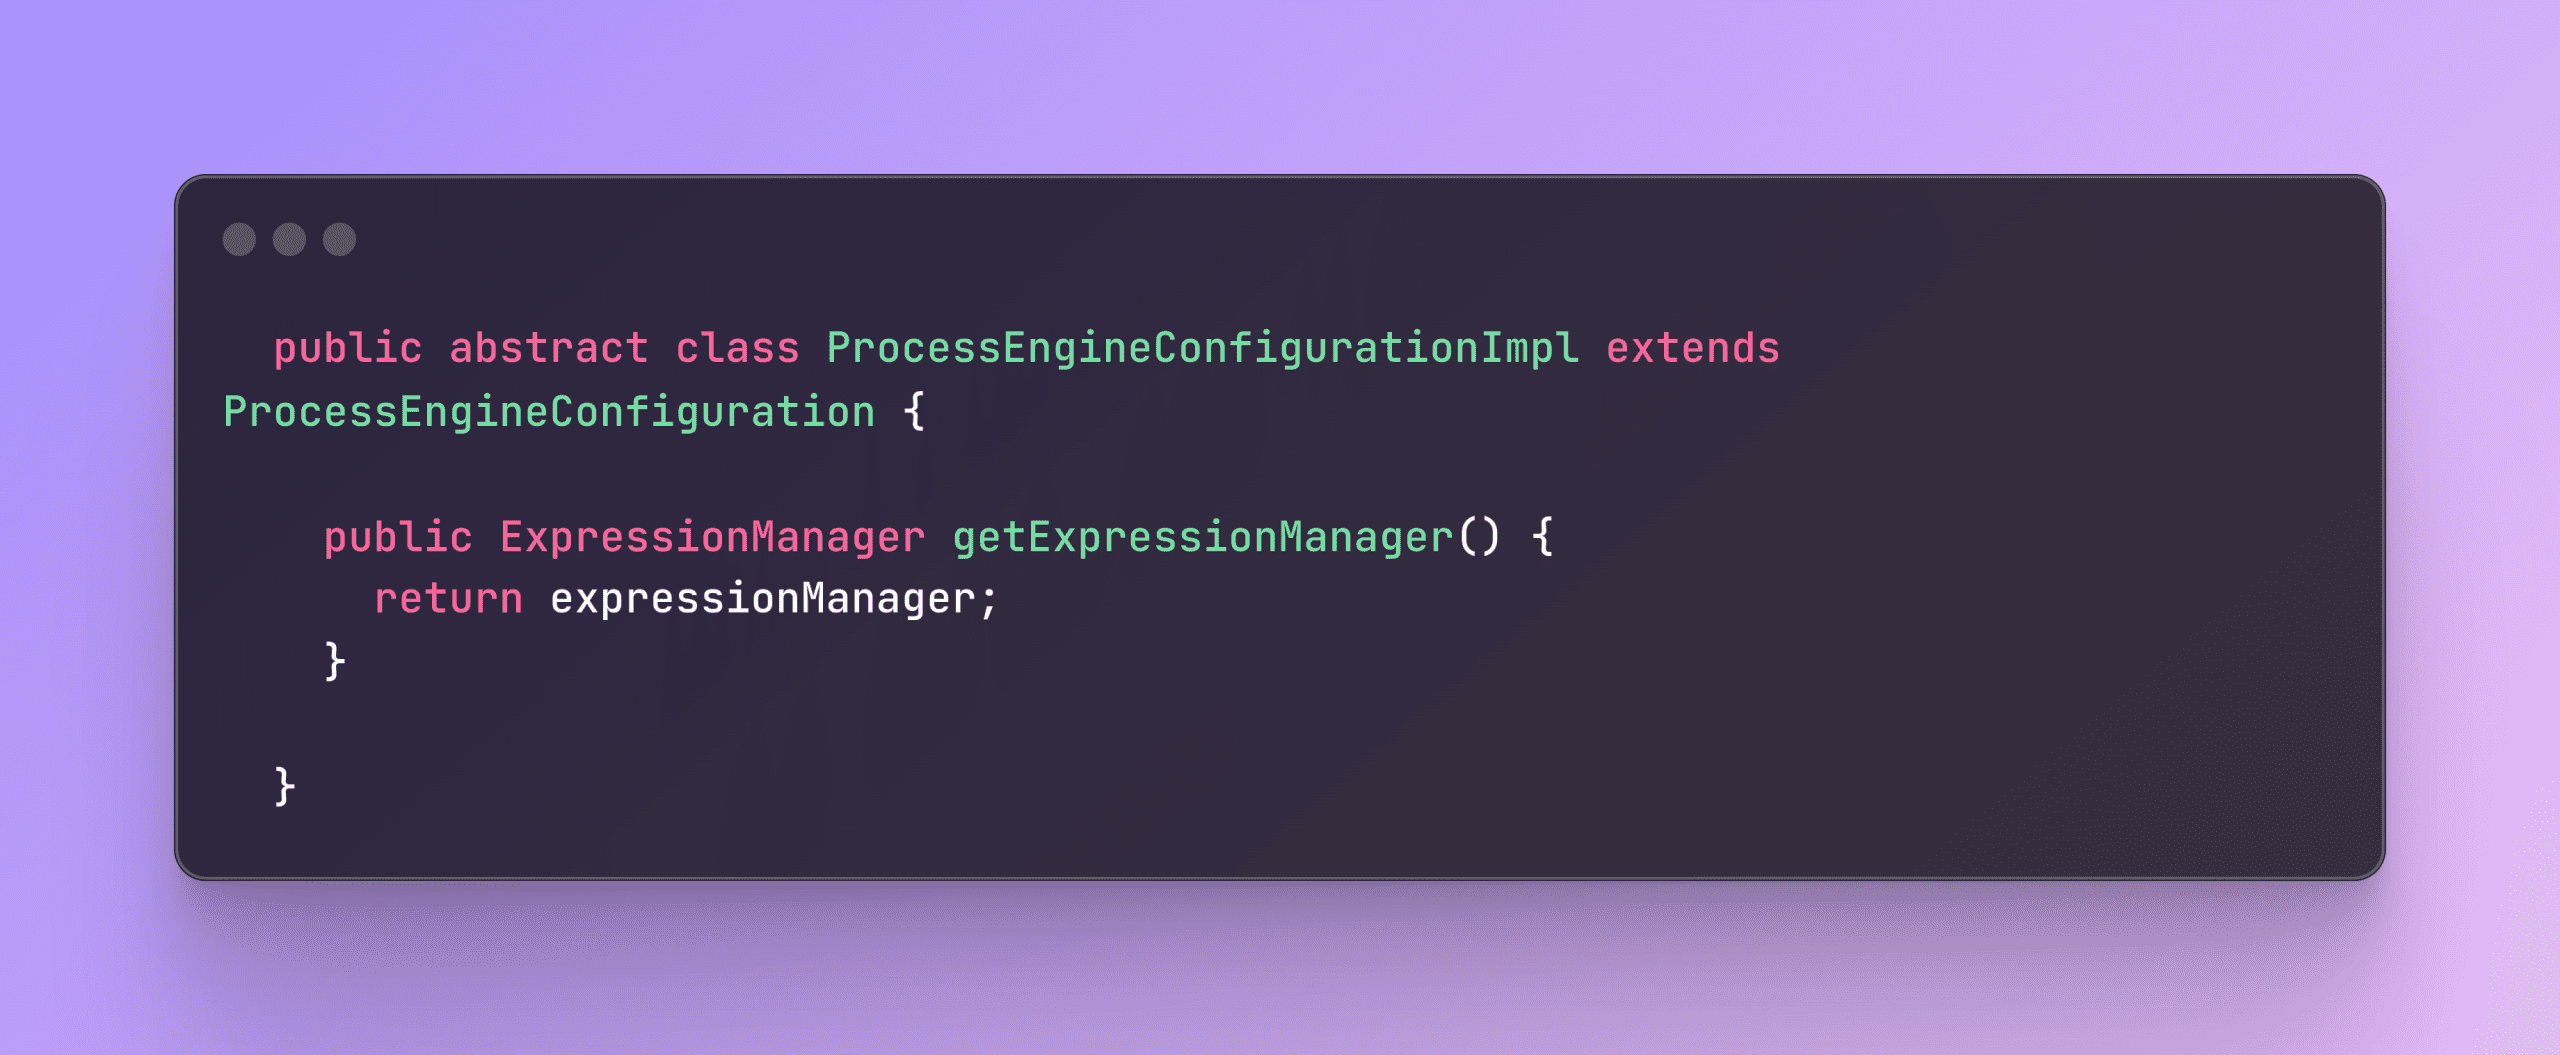
In both approaches, you need to register your method via the function mapper. If you want to call a method from a bean using an expression like ${myBean.method()}, the process happens automatically without any additional code. However, if you prefer to use the method in the format ${runner:method()} or ${method()}, here’s how you can do it.

In the ProcessEngineConfigurationImpl class provided by Camunda, you’ll find the ExpressionManager. This class exposes all the necessary methods for you to use.

image 11 - quochung.cyou PTIT
image 12 - quochung.cyou PTIT

To register a new function mapper, you need to create a class that implements the FunctionMapper interface. Here’s a sample implementation to get you started.

image 13 - quochung.cyou PTIT

Now, you can create a process engine plugin to initialize the function mapper when Camunda’s process engine starts configuring.

image 14 - quochung.cyou PTIT

Now you can use ${jsonPath(a, b) in workflow

After Camunda BPM 7.18

After Camunda 7.18, the addFunctionMapper function was removed. You might need an alternative workaround, and this link might be helpful for you.

https://forum.camunda.io/t/how-do-i-add-functionmappers-to-expressionmanager-in-7-18/40466/2

Comparison of Open-Source Status Page Solutions

In this blog post, we will delve into a detailed comparison of several open-source projects used to create status pages. Status pages are essential for keeping users informed about the operational status and incidents of various services. We will analyze the pros and cons of each solution, focusing on aspects such as community support, feature set, and maintainability. The open-source projects we will compare include CState, Kener, Cachet, Statping, and OneUpTime.

Pros And Cons

CState (Static Page)

Repository: CState on GitHub

image 4 - quochung.cyou PTIT

Pros:

  • Still maintained.
  • Large community support.
  • Supports categories and services, following the feature-service model.
  • Allows status updates by creating an incident.

Cons:

  • Static site, not dynamic. Changes like adding services require a site rebuild.
  • No API for remote updates.
  • No automated health checks.
  • No scheduling calendar for maintenance.

Kener (JavaScript)

image 9 - quochung.cyou PTIT

Repository: Kener on GitHub

Pros:

  • Still maintained.
  • Large community support.
  • API support for status updates and health check automation.
  • Supports cron jobs for automatic API health checks.
  • Allows creating incidents which override the API status updates.

Cons:

  • Supports categorizing multiple services but does not synchronize category status with services. (For ex: when a service go down, the whole category will not see any affect, currently it feel like just a category for “minimize and grouping”, not really have any function for category)

Cachet

image 7 - quochung.cyou PTIT

Repository: Cachet on GitHub

Pros:

  • Active Maintenance: Frequently updated and well-maintained.
  • Community Support: Large community support.
  • API Support: Comprehensive API for status updates and management.
  • Component-Based: Allows for detailed component and group management.

Cons:

  • Group Limitations: Services can only be linked to one group, which might limit flexibility.
  • PHP-Based: Requires a PHP environment, which may not be ideal for all users.

Statping

image 10 - quochung.cyou PTIT

Repository: Statping on GitHub

Pros:

  • API Support: API for status updates and multi-platform support, including mobile apps.
  • Management Dashboard: Includes a comprehensive dashboard for managing services.
  • Automated Monitoring: Supports automated health checks with response time metrics.

Cons:

  • Maintenance: Less frequently maintained, which could pose risks for long-term use.
  • Group Limitations: Similar to Cachet, services can only be linked to one group.

Additional Insights:

  • Platform Compatibility: Compatible with multiple platforms, enhancing flexibility.
  • User Experience: Intuitive dashboard and easy-to-navigate interface.

OneUpTime

image 8 - quochung.cyou PTIT

Repository: OneUpTime on GitHub

Pros:

  • Active Maintenance: Frequently updated and maintained.
  • Comprehensive Features: Includes a management dashboard, automated health checks, and scheduling for maintenance.
  • Incident Management: Allows manual incident creation and supports announcements and alerts.

Cons:

  • Complexity: Complex system with many services, which might be overwhelming for some users.
  • Integration: Requires careful integration with existing authentication systems.

Conclusion

FeatureCStateKenerCachetStatpingOneUpTime
LanguageStatic Page, HTMLJavaScriptPHPGoJavaScript
MaintainabilityMaintainedMaintainedMaintainedPoorly maintainedMaintained
Grouping ServicesSupportedSupported (need tweaks)Single Group per ServiceSingle Group per ServiceSupported
Manual Incident UpdatesSupported (static config)SupportedSupportedSupportedSupported
Automated Health ChecksNot SupportedSupportedSupportedSupportedSupported
Maintenance SchedulingNot SupportedSupportedSupportedSupportedSupported
Operational Management DashboardNot SupportedNot SupportedSupportedSupportedSupported
API for Operations and Incident ManagementNot SupportedSupportedSupportedSupportedSupported

Summary

  • CState: A good choice if you prefer a simple, static site. It is fast and easy to host but lacks dynamic updates and automated health checks.
  • Kener: Suitable for those needing dynamic updates and automated health checks, with a high level of customization possible through JavaScript. However, it requires additional coding for full functionality.
  • Cachet: A well-rounded option with a user-friendly interface and comprehensive API support. It is best suited for environments where PHP is already in use.
  • Statping: Provides a comprehensive feature set with automated monitoring and a management dashboard. However, it is less frequently maintained, which could be a concern for long-term reliability.
  • OneUpTime: Offers the most features, including health checks, scheduling, and a management dashboard. It is highly scalable and suitable for enterprise-level applications but is complex and requires careful integration.

By evaluating these options based on your specific requirements and technical capabilities, you can select the most suitable open-source project for your status page needs.

Camunda 7 | Get history data of form in user task

Introduction to Camunda 7

image 2 - quochung.cyou PTIT

Camunda 7 is a powerful, open-source platform designed for workflow and process automation. It offers a comprehensive suite of tools for managing business processes, including capabilities for modeling, automating, and optimizing workflows. One of the key features of Camunda is its ability to track and retrieve historical data, such as process variables and form data, from completed process instances. However, retrieving form data from completed instances can be tricky as Camunda 7 does not provide an out-of-the-box API for this purpose.

Retrieving Historical Data

When working with Camunda, it’s often necessary to access historical data from completed process instances. This data can include process variables and form data, which provide insights into the execution and outcomes of the process. Retrieving this data is essential for reporting, auditing, and analysis purposes.

In this solution:

  1. The BPMN model instance is retrieved using the repositoryService.
  2. The task is fetched from the BPMN model using the task definition key.
  3. If the task is found, the form key is retrieved from the task attributes.
  4. The deployment ID is obtained from the process definition query.
  5. The form resource is retrieved using the GetDeploymentResourceCmd.
  6. The form data is read into a map and set into the result DTO as a JSON string.

Accessing Historical Form Data

By default, Camunda 7 does not provide an out-of-the-box API to retrieve form data from completed process instances. To work around this limitation, you can use a custom approach to fetch the form data stored as process variables.

Here’s a workaround to retrieve form data:

image 3 - quochung.cyou PTIT

Integration Testing Camunda 7 | No startFormHandler defined in process

Introduction to Camunda

image - quochung.cyou PTIT

Camunda is a popular open-source platform for workflow and process automation. It enables developers to model, automate, and optimize business processes. Camunda integrates well with Java applications, offering robust capabilities for managing complex workflows and business rules.

Understanding the Error

When performing integration testing in Camunda, you might encounter the following error:

org.camunda.bpm.engine.exception.NullValueException: No startFormHandler defined in process 'SalesOrderProcess_v2:1:cee4056f-a1d8-11eb-9f61-6683657f7a30': startFormHandler is null

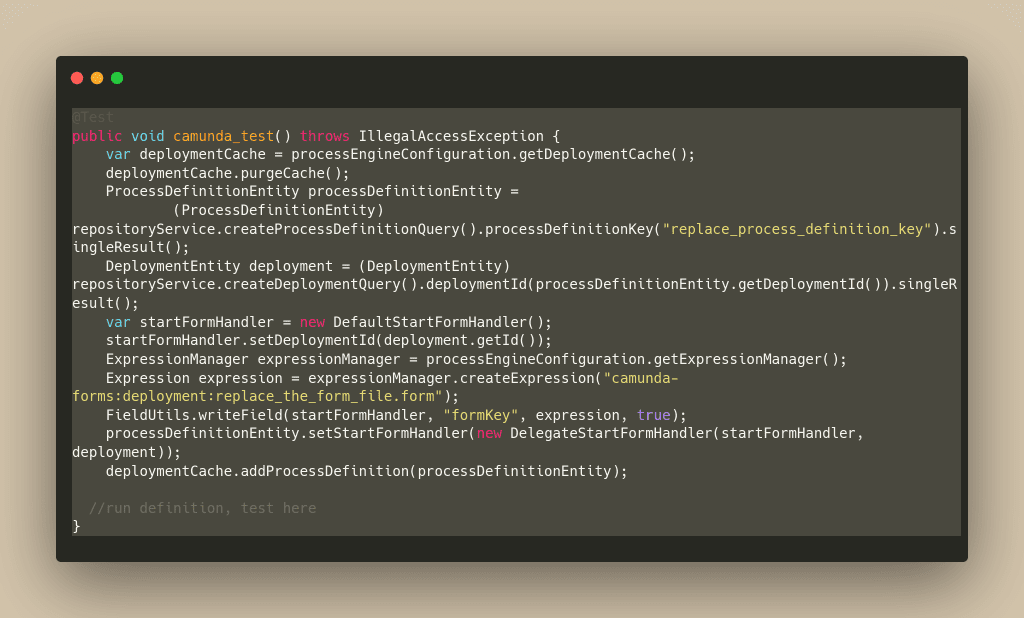
This error occurs because the start event of the process expects a form handler to be defined, but none is provided. The startFormHandler is responsible for managing the form associated with the start event. When it is not defined, Camunda throws a NullValueException. This problem likely cause because of, usually camunda will have BpmnParser class that when reading the XML bpmn file, it will construct the event handler. But in your test, you not inject it

Solution: Mocking the Start Event Handler

To resolve this issue, you can mock the start event handler in your integration tests. The following example demonstrates how to set up a mock start event handler to bypass the error and proceed with the testing.

Truncate table to make sure it clean state before test

      - ACT_HI_ACTINST
      - ACT_HI_DETAIL
      - ACT_HI_PROCINST
      - ACT_HI_TASKINST
      - ACT_RU_EXECUTION
      - ACT_RU_IDENTITYLINK
      - ACT_RU_TASK
      - ACT_RU_VARIABLE
      - ACT_RE_PROCDEF
      - ACT_RE_DEPLOYMENT
      - ACT_ID_USER
      - ACT_ID_GROUP
      - ACT_ID_MEMBERSHIP
      - ACT_ID_INFO
      - ACT_ID_TENANT
      - ACT_ID_TENANT_MEMBER
      - ACT_GE_BYTEARRAY

In this solution:

  1. The deployment cache is purged to ensure a clean state.
  2. The process definition is retrieved based on the process definition key.
  3. The deployment entity associated with the process definition is obtained.
  4. A DefaultStartFormHandler is created and associated with the deployment.
  5. The form key is set using the ExpressionManager.
  6. The DelegateStartFormHandler is assigned to the process definition.
  7. The process definition is added back to the deployment cache.
image 1 - quochung.cyou PTIT

[LibGDX | Java 2D Game] Phần 1: Cài đặt môi trường

Lời mở đầu

image 19 - quochung.cyou PTIT

Xin chào mọi người! Trước khi bắt tay vào việc phát triển game 2D với LibGDX, hãy dành một chút thời gian để hiểu rõ hơn về ‘bộ công cụ’ mà chúng ta sẽ sử dụng.

LibGDX là một framework mạnh mẽ cho phép lập trình viên tạo game đa nền tảng, từ desktop cho tới mobile và web, mà không cần thay đổi đoạn code nguồn. Thông qua ngôn ngữ Java – một ngôn ngữ lập trình rất phổ biến vì tính linh hoạt, mạnh mẽ và khá dễ tiếp cận, được giảng dạy tại nhiều trường đại học trên thế giới.

Video

Chào mọi người! Video này là phần đầu tiên trong series hướng dẫn sử dụng LibGDX để phát triển game 2D sử dụng Java. Ở tập này, mình sẽ dẫn dắt các bạn qua quá trình cài đặt môi trường phát triển game, bao gồm cách thiết lập LibGDX và các công cụ cần thiết để bắt đầu tạo ra những tựa game đầu tiên của mình. Ngoài ra là một chút khái niệm về cách render tile của game 2D và game loop

Các tài nguyên sử dụng trong video:

Triển khai Cursor Pagination trong Java Spring JPA/Hibernate

Từ bài viết trước

Cursor Pagination

Kĩ thuật: keyset pagination and seek method

Ở một số trang web, bạn sẽ thấy, bạn không thể đi đến thẳng trang cuối, hoặc nhảy đến 1 trang bất kì, mà thông thường sẽ có nút để sang trang kế và trang phía trước. Như vậy ta có thể assume rằng:

Người dùng sẽ chỉ mở trang 10 sau khi mở trang 9.Vậy, ta chỉ cần nhớ vị trí cuối cùng của bài viết ở trang 9 là ở id bao nhiêu, rồi dùng WHERE để truy vấn từ điểm đó, chứ không cần bỏ dần để đi đến điểm đó nữa

SELECT * FROM my_table WHERE id > 21 ORDER BY id LIMIT 5
image 17 - quochung.cyou PTIT
Tối ưu truy vấn Pagination (phân trang) sử dụng Spring Boot (Java) 38

Ví dụ: Sort theo thời gian

SELECT *
FROM my_table
WHERE (update_date = '2017-12-21' AND id > 21) 
    OR update_date > '2017-12-21'
ORDER BY update_date,id LIMIT 5

Cơ bản là ta sẽ chỉ lấy các bài viết có cùng thời gian đăng như bài viết cuối và id > , hoặc thời gian lớn hơn bài viết cuối

image 18 - quochung.cyou PTIT

Để hình dung rõ hơn, hãy thử nhìn vào bảng sau:

IDName
1An
2Nam
3Quan
4Tien
5Hoang
6Nguyen
7Duc
8Thanh
9Hai
10Minh

Ta mong muốn nhận được dữ liệu ở Page 1 như sau

IDName
1An
2Nam
3Quan
4Tien
5Hoang

Ta sẽ có câu query để lấy page 2 dạng như sau

Lấy page 1: SELECT * FROM users ORDER BY ID LIMIT 5
SELECT * FROM users WHERE ID > '5' ORDER BY ID LIMIT 5

Ta có thể thêm HAL bằng Spring HateOAS để response trả về ở dạng như sau, giúp ta lấy dữ liệu dễ dàng hơn

{
    “cursor”: {
        “previous_page”: null,
        “next_page”: "next___5"
    }
}
{
    “cursor”: {
        “previous_page”: "prev___5" ,
        “next_page”: "next___10"
    }
}
  • Cursor sẽ như một con trỏ chỉ tới một record nào đó trong dữ liệu, và khi ta truyền cursor đó vào, backend cần biết ta đang muốn lấy trang tiếp theo hay trang trước từ vị trí con trỏ đó
  • Có nhiều cách để làm điều này, ví dụ thêm prefix dạng như prev___, hay next___ như ví dụ trên
  • Hoặc đơn giản hơn, ta sẽ truyền thêm một biến chỉ ra là đó là next hay prev

Null Cursor

  • Lúc này, từ phía backend, ta có thể sử dụng count hoặc tương tự để kiểm tra xem có trang ở trước đó hay ở sau đó không, rồi trả response ra là null để thể hiện rằng không còn trang nào khác để đi tới ở hướng đó.

Next Cursor

  • Có thể bạn đã nắm được về cách để đi tới trang tiếp theo với cursor pagination.
  • Ví dụ, ta có một danh sách id tăng dần, thì từ trang có id [1,2,3,4,5], ta sẽ where id > 5 để tới trang tiếp theo
SELECT * FROM entries WHERE (myCol > 5) ORDER BY myCol ASC LIMIT 2; -> 6,7
SELECT * FROM entries WHERE (myCol > 7) ORDER BY myCol ASC LIMIT 2; -> 8,9
image 9 - quochung.cyou PTIT
image 10 - quochung.cyou PTIT
  • Với một danh sách id giảm dần, ví dụ trang là [10,9,8,7,6] thì ta sẽ where id < 6 để tới trang tiếp theo.
SELECT * FROM entries WHERE (myCol < 5) ORDER BY myCol DESC LIMIT 2; -> 4,3
SELECT * FROM entries WHERE (myCol < 3) ORDER BY myCol DESC LIMIT 2; -> 2,1
image 11 - quochung.cyou PTIT
image 12 - quochung.cyou PTIT

Previous Cursor

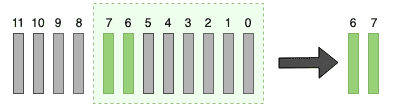
  • Tuy nhiên, việc đi tới trang trước đó trở lên khó khăn hơn. Bởi vì dữ liệu sẽ được trả ra từ phía trái đầu
  • Ví dụ, ta đang ở trang id [8,9] , và ta thực hiện truy vấn lấy trang trước đó, 2 phần tử
SELECT * FROM entries WHERE (myCol < 8) ORDER BY myCol ASC LIMIT 2;
image 13 - quochung.cyou PTIT
  • Kết quả sẽ trả về 0,1. Bởi vì nó đang đọc từ trái sang, và khi limit sẽ lấy từ đầu trái chứ không lấy 6,7

Cách giải quyết lấy previous cursor

  • Cách để giải quyết vấn đề này, ta sẽ đảo ngược chiều order by, và sau đó khi limit để lấy đúng vùng dữ liệu xong, ta sẽ đảo một lần nữa về chiều đúng
SELECT pagination.* FROM(SELECT * FROM entries WHERE (myCol < 8) ORDER BY myCol DESC LIMIT 2) AS pagination ORDER BY myCol ASC;
image 14 - quochung.cyou PTIT
  • Các bước vừa xảy ra
  • 1. Đầu tiên, select các row có id < 8 và order by desc. ta có 7,6,…,1,0
  • Sau đó limit 2 để lấy 7,6
  • Rồi order by asc lần nữa để lấy thành 6,7 . Là thứ tự ASC như ban đầu ta muốn

Time Complexity

  • Next Page Travesal: O(log(N) + L) , ta mấy log(N) để tìm tới điểm bất kì vì nó thực hiện như binary search và ta đã index database. Và L là Limit là số ta phải lặp đến để lấy vùng đầu tiên đã chọn
  • Previous Page Traversal: O(log(N) + 2L), sở dĩ là 2L vì ta đã phải đảo chiều 1 lần.
  • Thông thường limit được đặt ở 5-20 cho 1 trang, vì vậy có thể coi L là constant và không đáng kể

Triển khai trong code

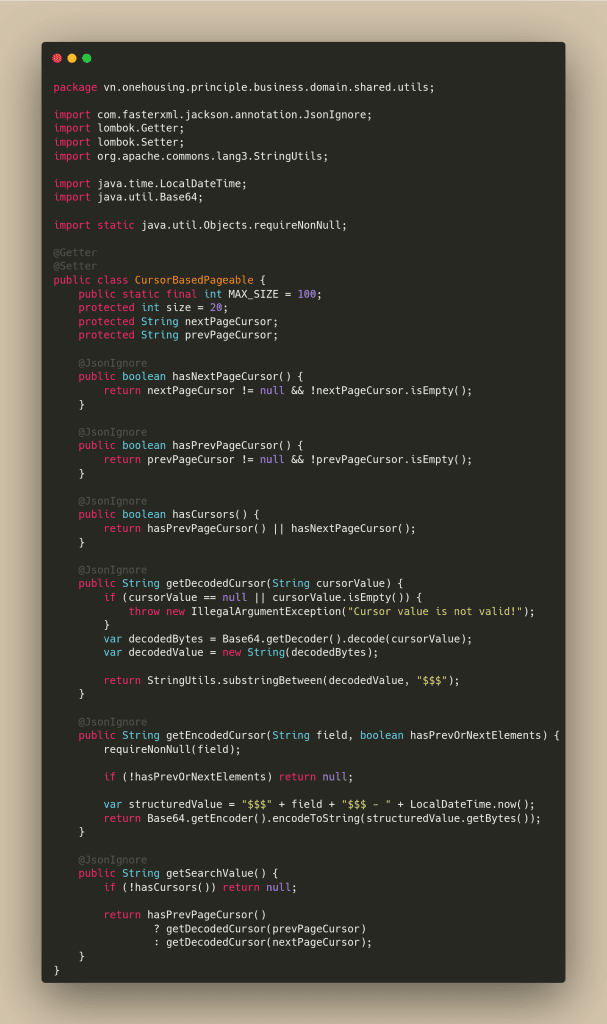
image 15 - quochung.cyou PTIT
  • Ta có một class thực hiện việc lấy cursor trước hoặc sau. Sử dụng để decode một giá trị cursor base64 hoặc encode 1 giá trị
  • Ví dụ ta đang cursor pagination theo column 35, ta sẽ có hàm getEncodeCursor để tạo ra giá trị mã hoá cursor
  • Hàm getDecodedCursor sẽ chuyển giá trị mã hoá đó thành số để dùng paging
image 16 - quochung.cyou PTIT
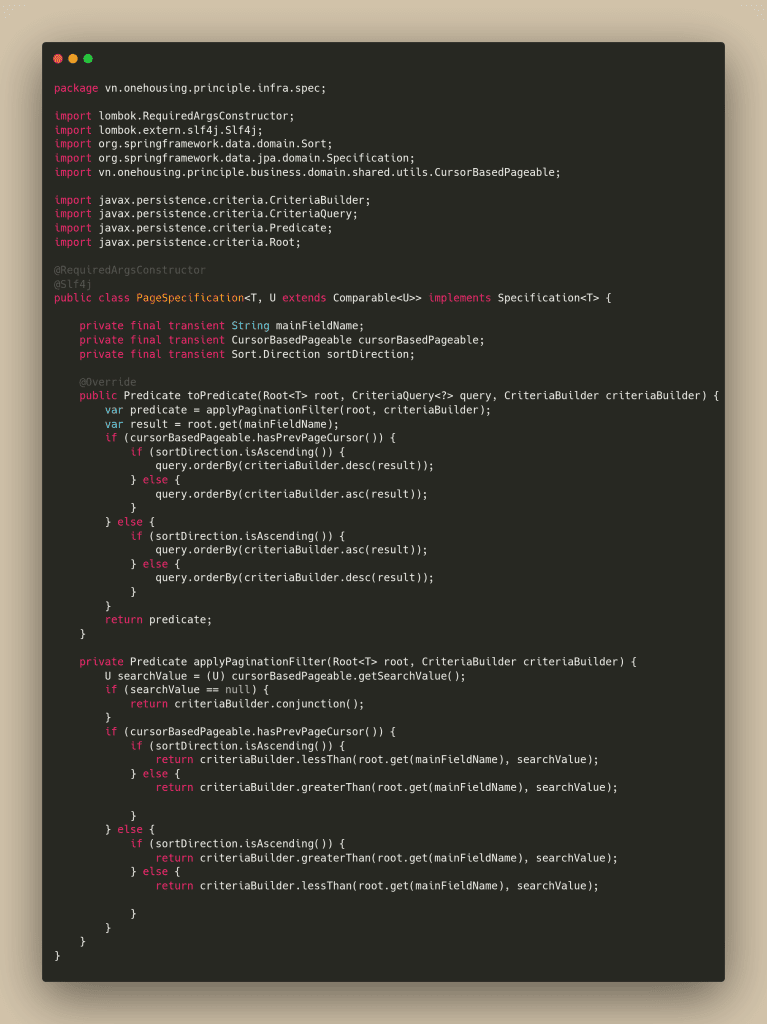
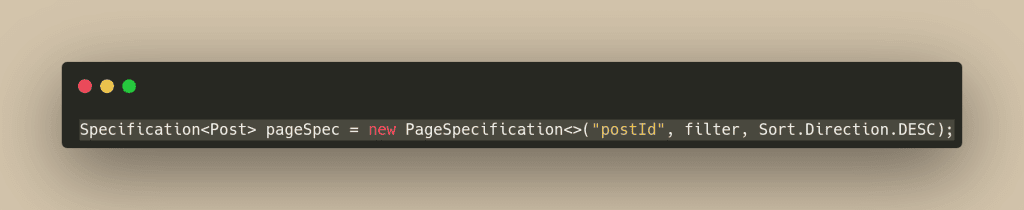
  • Đây là class thực hiện việc paging và nhảy trang. Có thể thấy logic sẽ kiểm tra xem ta đang lấy trang trước hay trang sau, sau đó sort cho phù hợp.
image 17 - quochung.cyou PTIT
image 18 - quochung.cyou PTIT
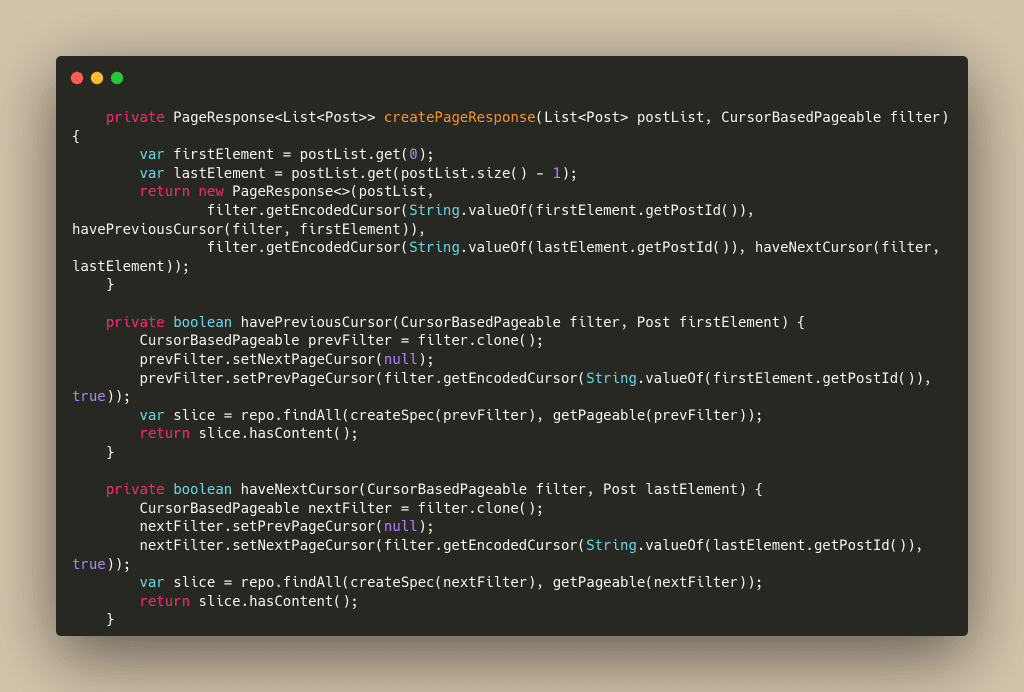
  • Class xử lý việc trả về. Tại đây ta sẽ lấy ra element tại đầu list và cuối list của trang hiện tại, rồi tìm thử xem phía trước đó còn trang nào không, hay sau đó còn trang nào hay không

Tham khảo: